Posted on Leave a comment

Fox Girl: a Make-Along Animal & Doll Hybrid

In anticipation of the fox make-along pattern that is coming to the shop tomorrow, a hybrid doll I made a while ago.

My make-along gal was happy wandering through the woods but something was missing.  In her heart she truly wanted to be a fox I guess. So she got fox ears and a tail sewn on. If you didn’t want a permanent transformation the tail could go on the butt of the overalls and the ears on a headband.

Our inspiration for her transformation…

Posted on 5 Comments

How to make: Wool Mouse made with wooden acorn

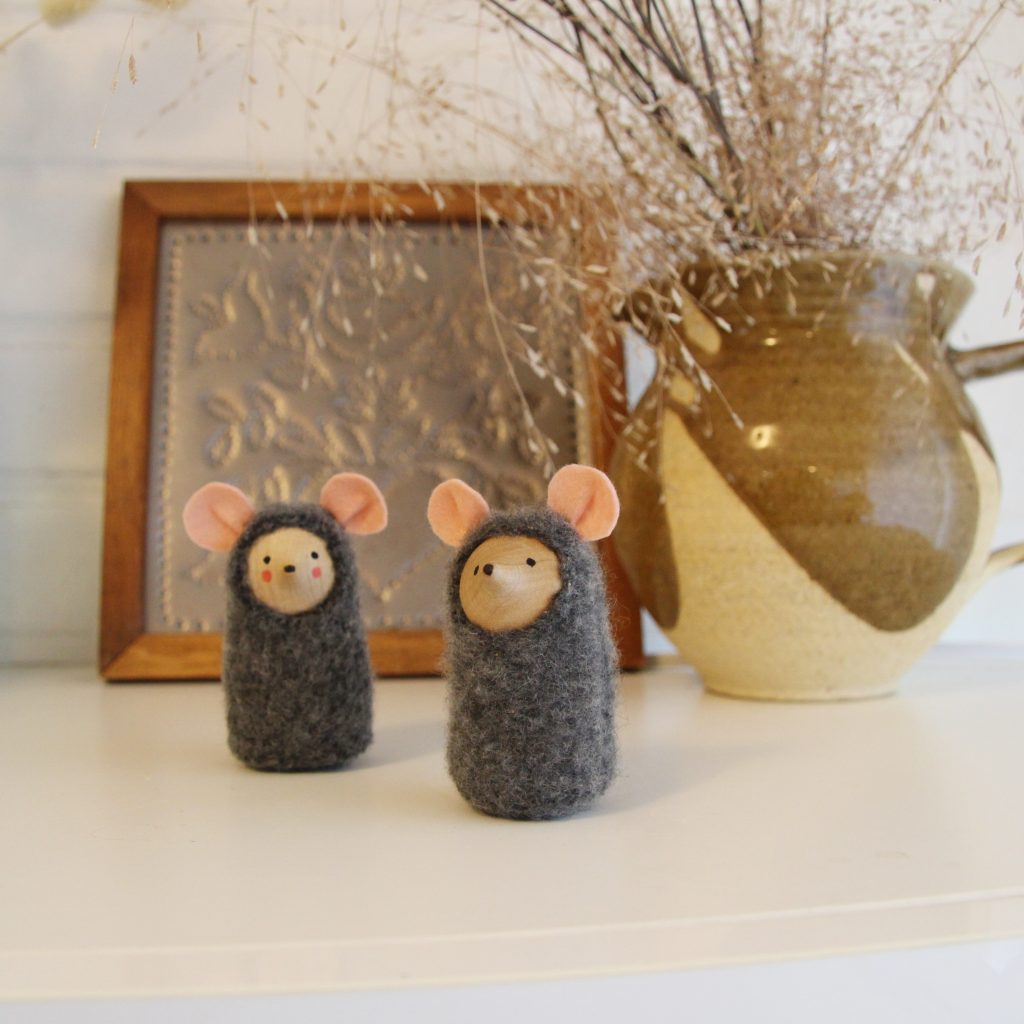
I saw the cutest palm sized cloth mice toys and I thought oh, how clever, they made the faces from wood acorns. But no that’s silly they were all cloth and soft and cute, but it stuck in my head, wondering if it would work so I made these little mice. I have a large assortment of wooden peg people, balls and other shapes and one of my favorites are the wood acorns, like these guys (amazon affiliate link)

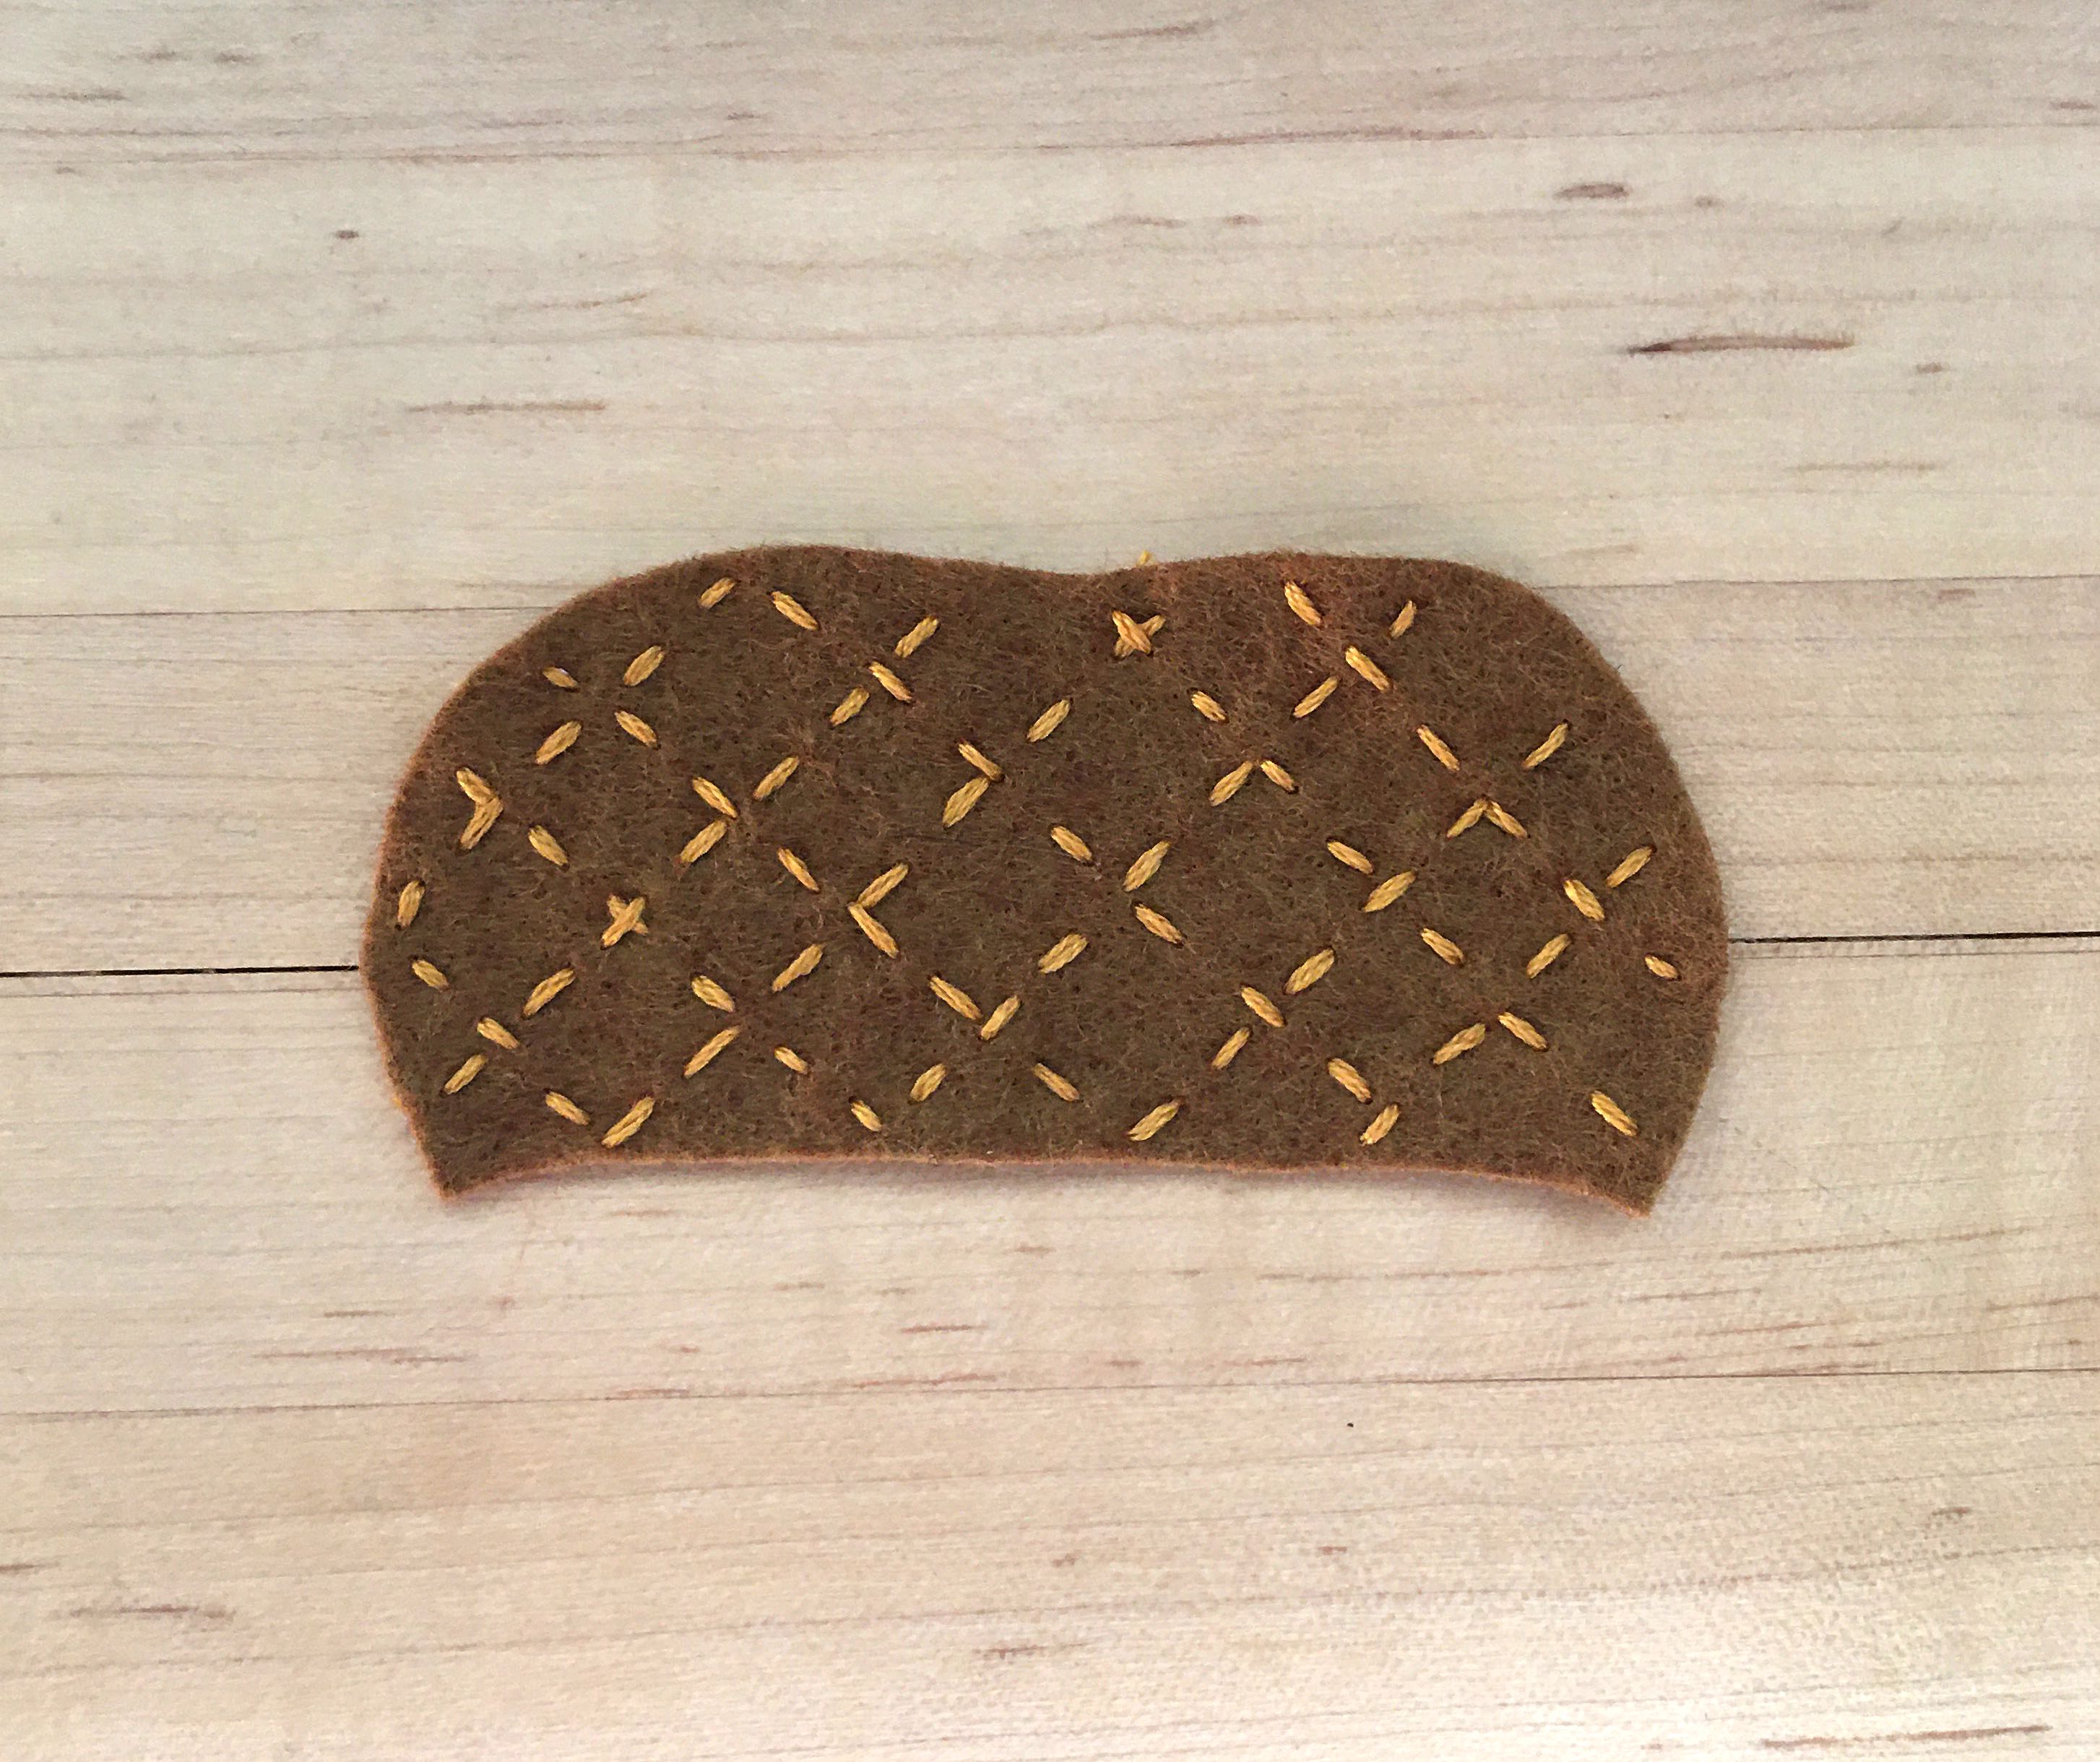
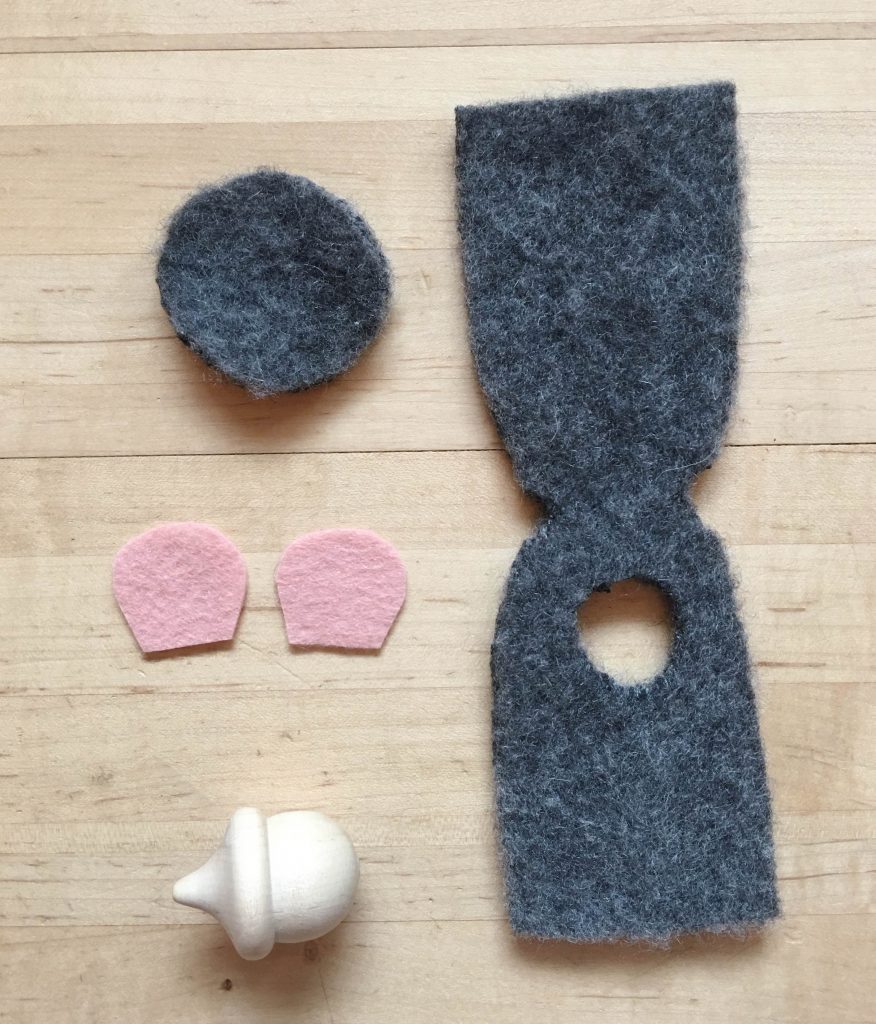
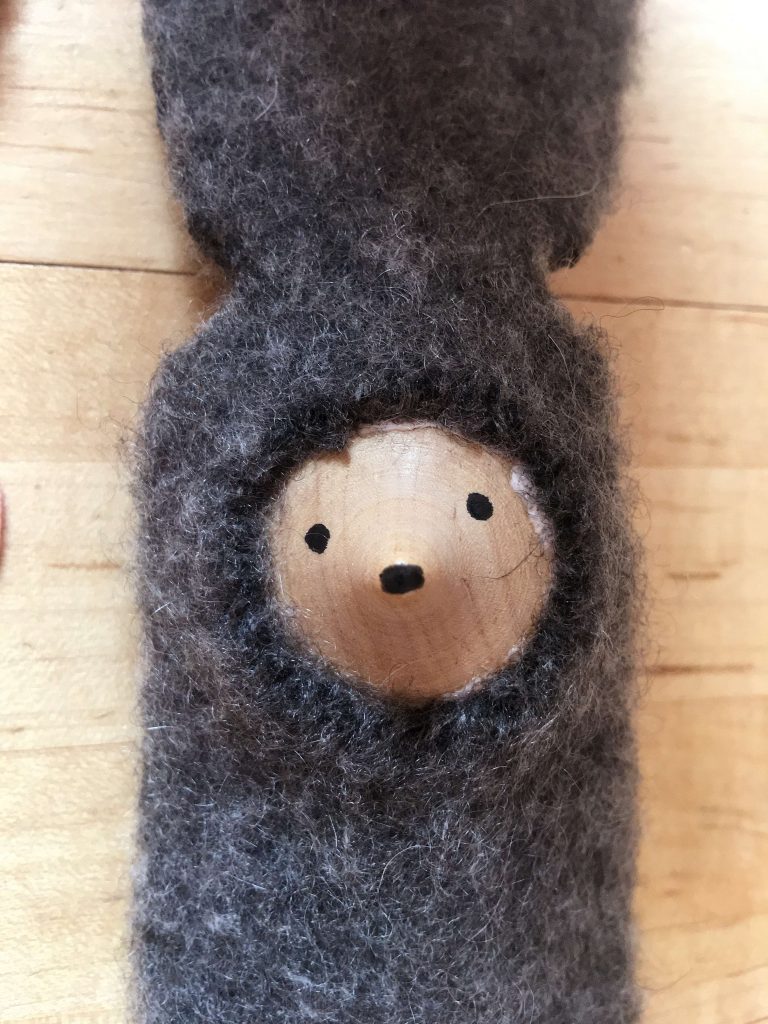
I used pink wool felt for the ears, very thick fuzzy grey wool that I had from felting a lambswool sweater, the wooden acorn, craft glue, stuffing and plastic beads. This is very forgiving project so you can eyeball your shapes from mine below. The hole for the acorn face should be just smaller than the acorn so it doesn’t pop through.

I drew the nose and eyes on the acorn with black marker and then ran a thin line of glue around outside edge of the face.

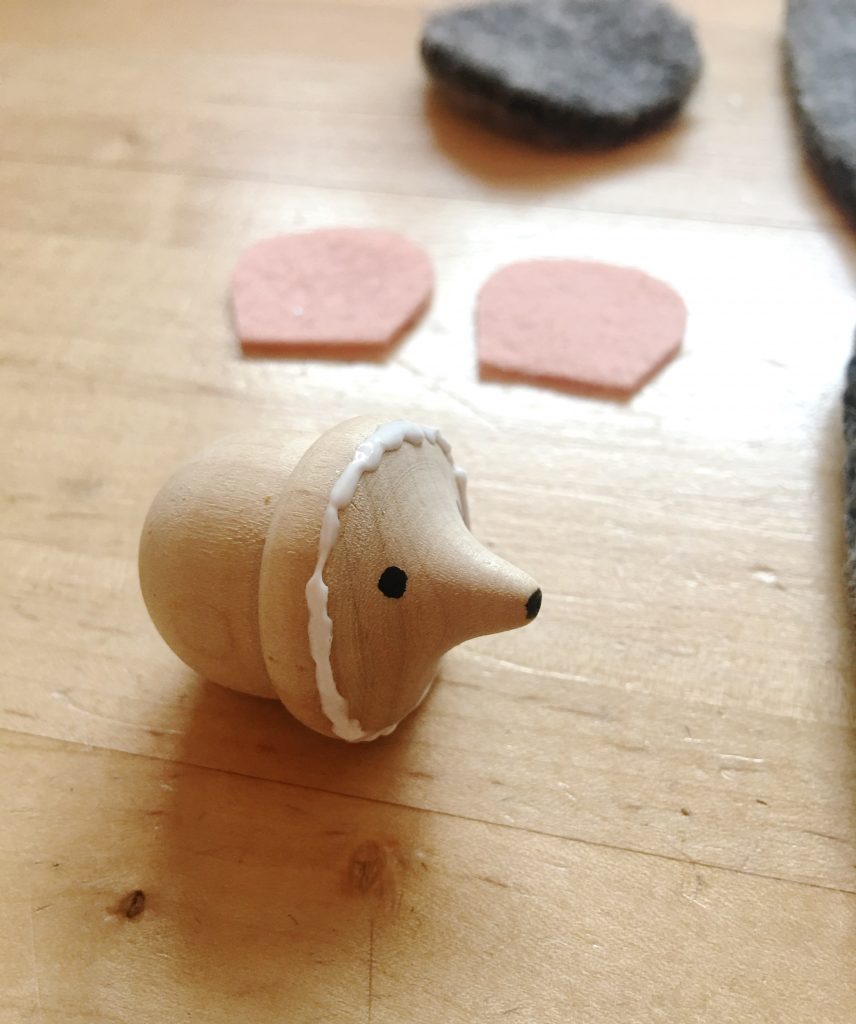
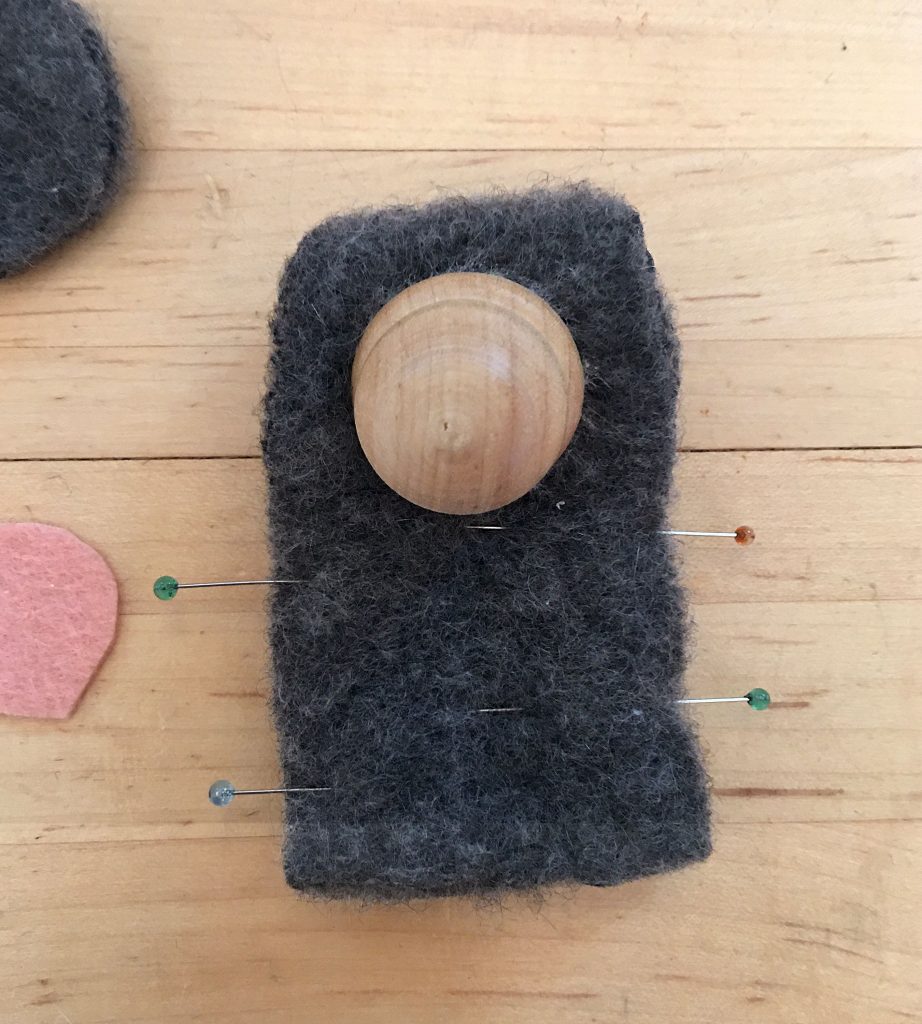
Then I popped the acorn head through the hole and pressed the wool down into the glue and waited for it to dry.

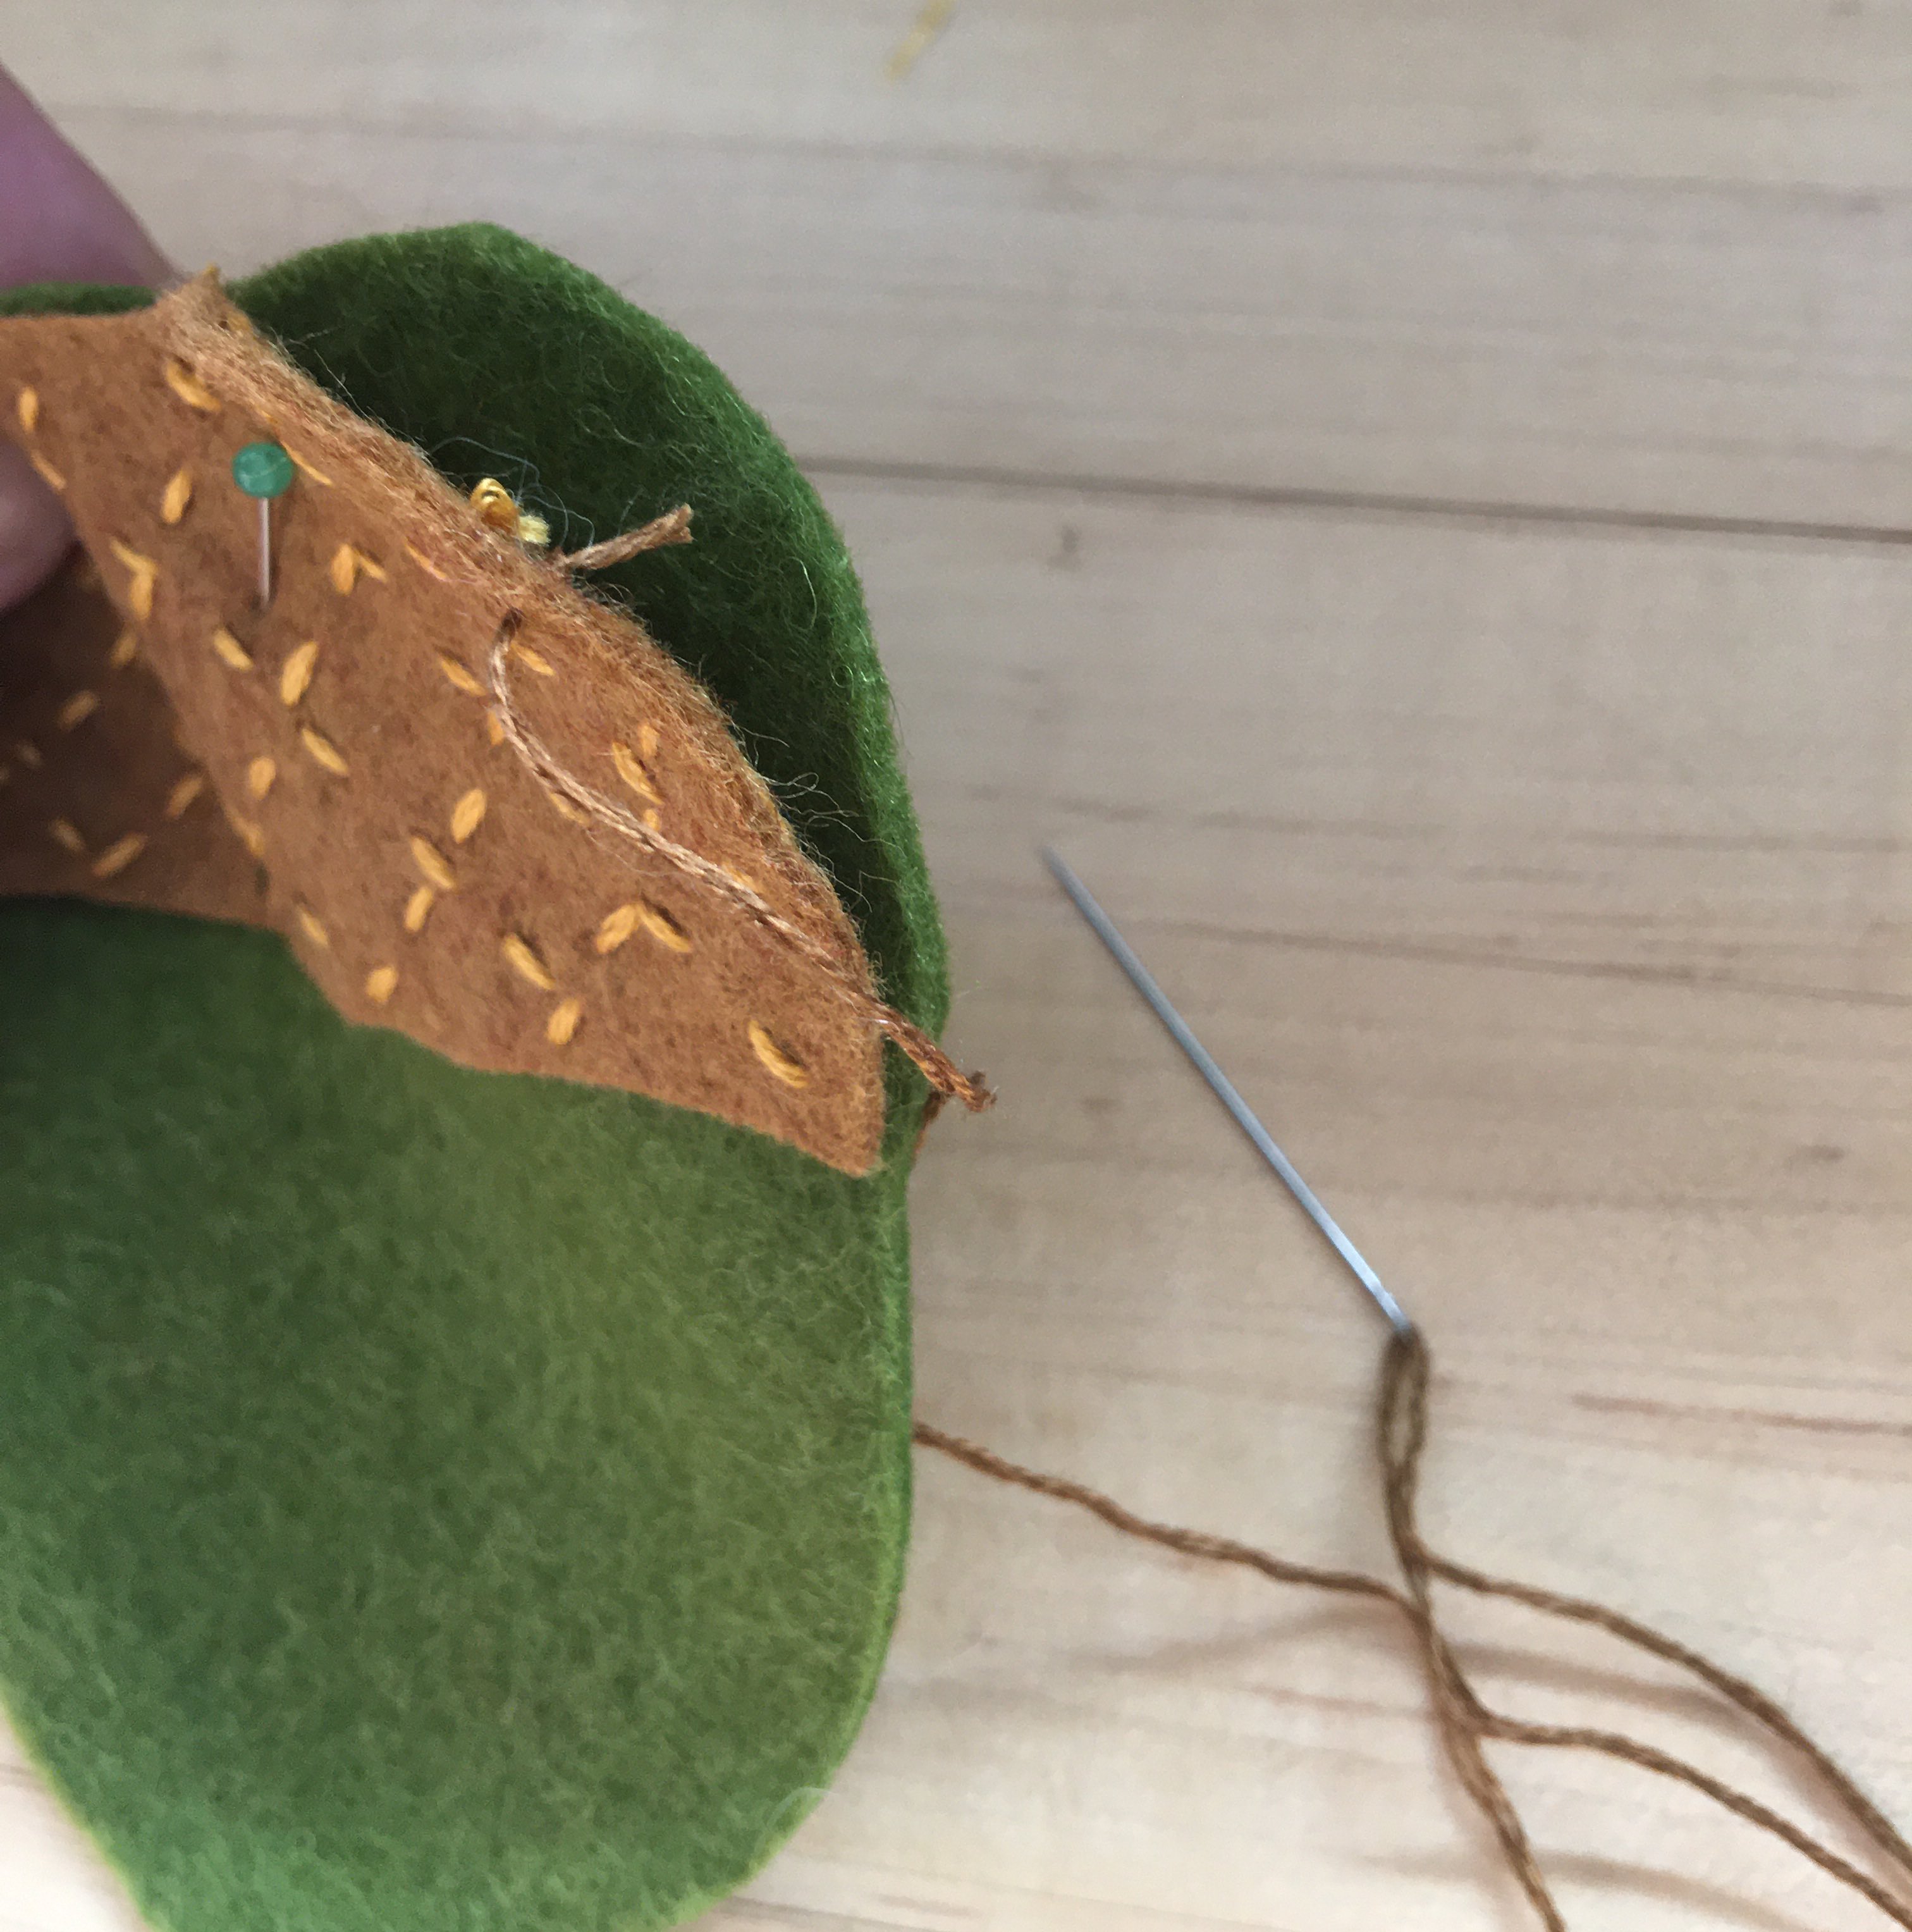
Then I folded the wool piece in half with bottom edges lining up and face facing inward and sewed up the sides.

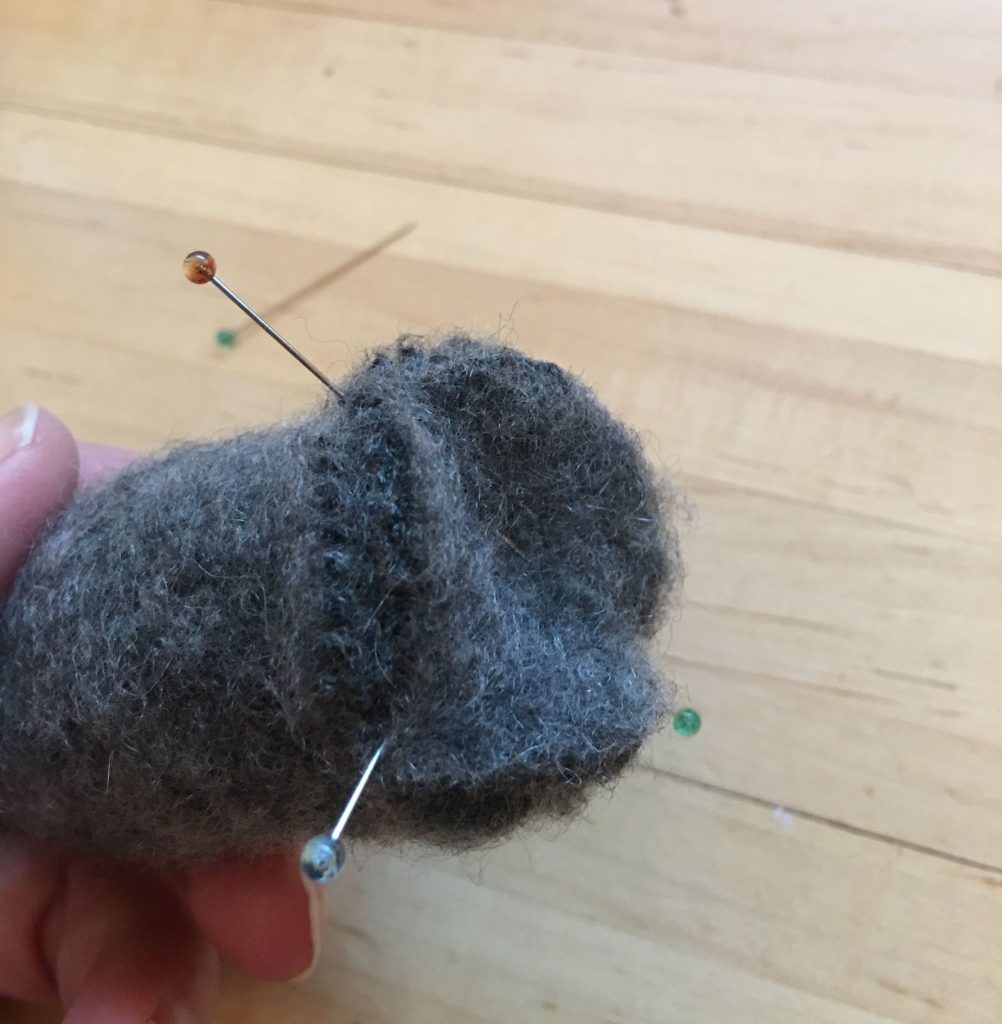
Turn right side out. Pin the round base to the bottom and sew 3/4 way around leaving a gap open to stuff it. I stuffed with polyfill and then put plastic filler beads at the bottom to weigh it down. Then sew it closed.

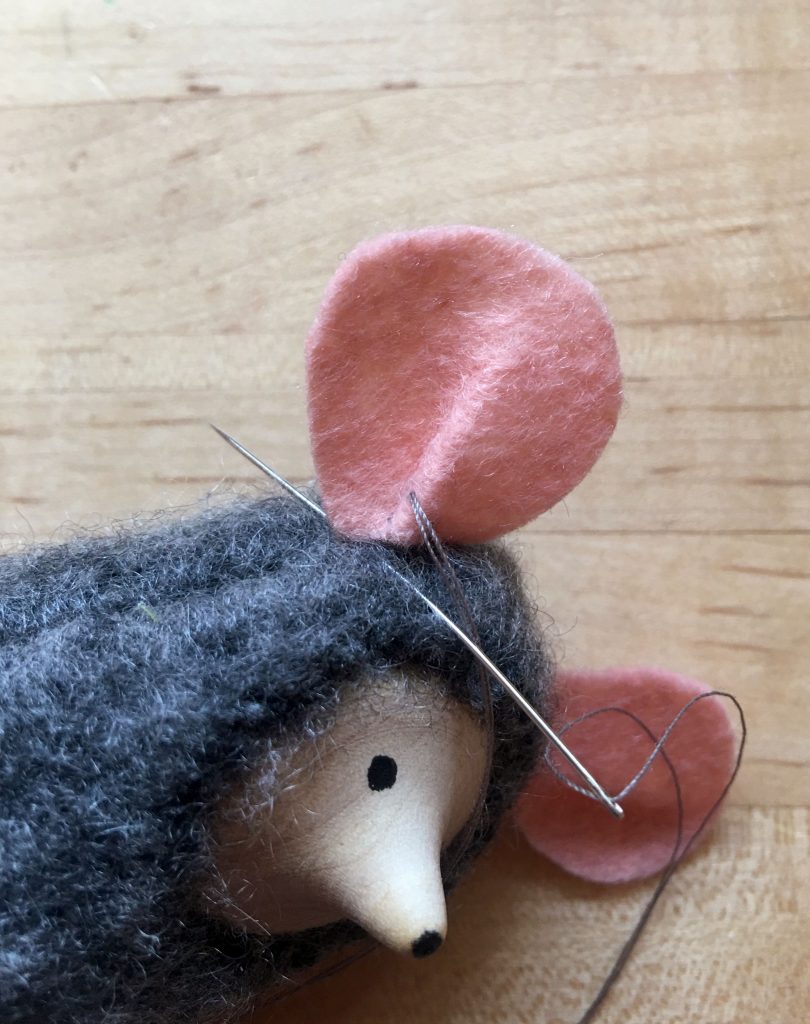
Fold a tuck in the ears and sew to the head. I trimmed my ears a bit after sewing them on because they were too mickey mouse. And I didn’t make a tail because for some reason mice are cute but mice tails, gross me out.

And that’s it! Wooden acorns tops would make cute faces on all sorts of woodland animals, fox, deer, squirrel, raccoon.

Posted on Leave a comment

FREE: Felt Acorn Backpack for the Make-Along Doll

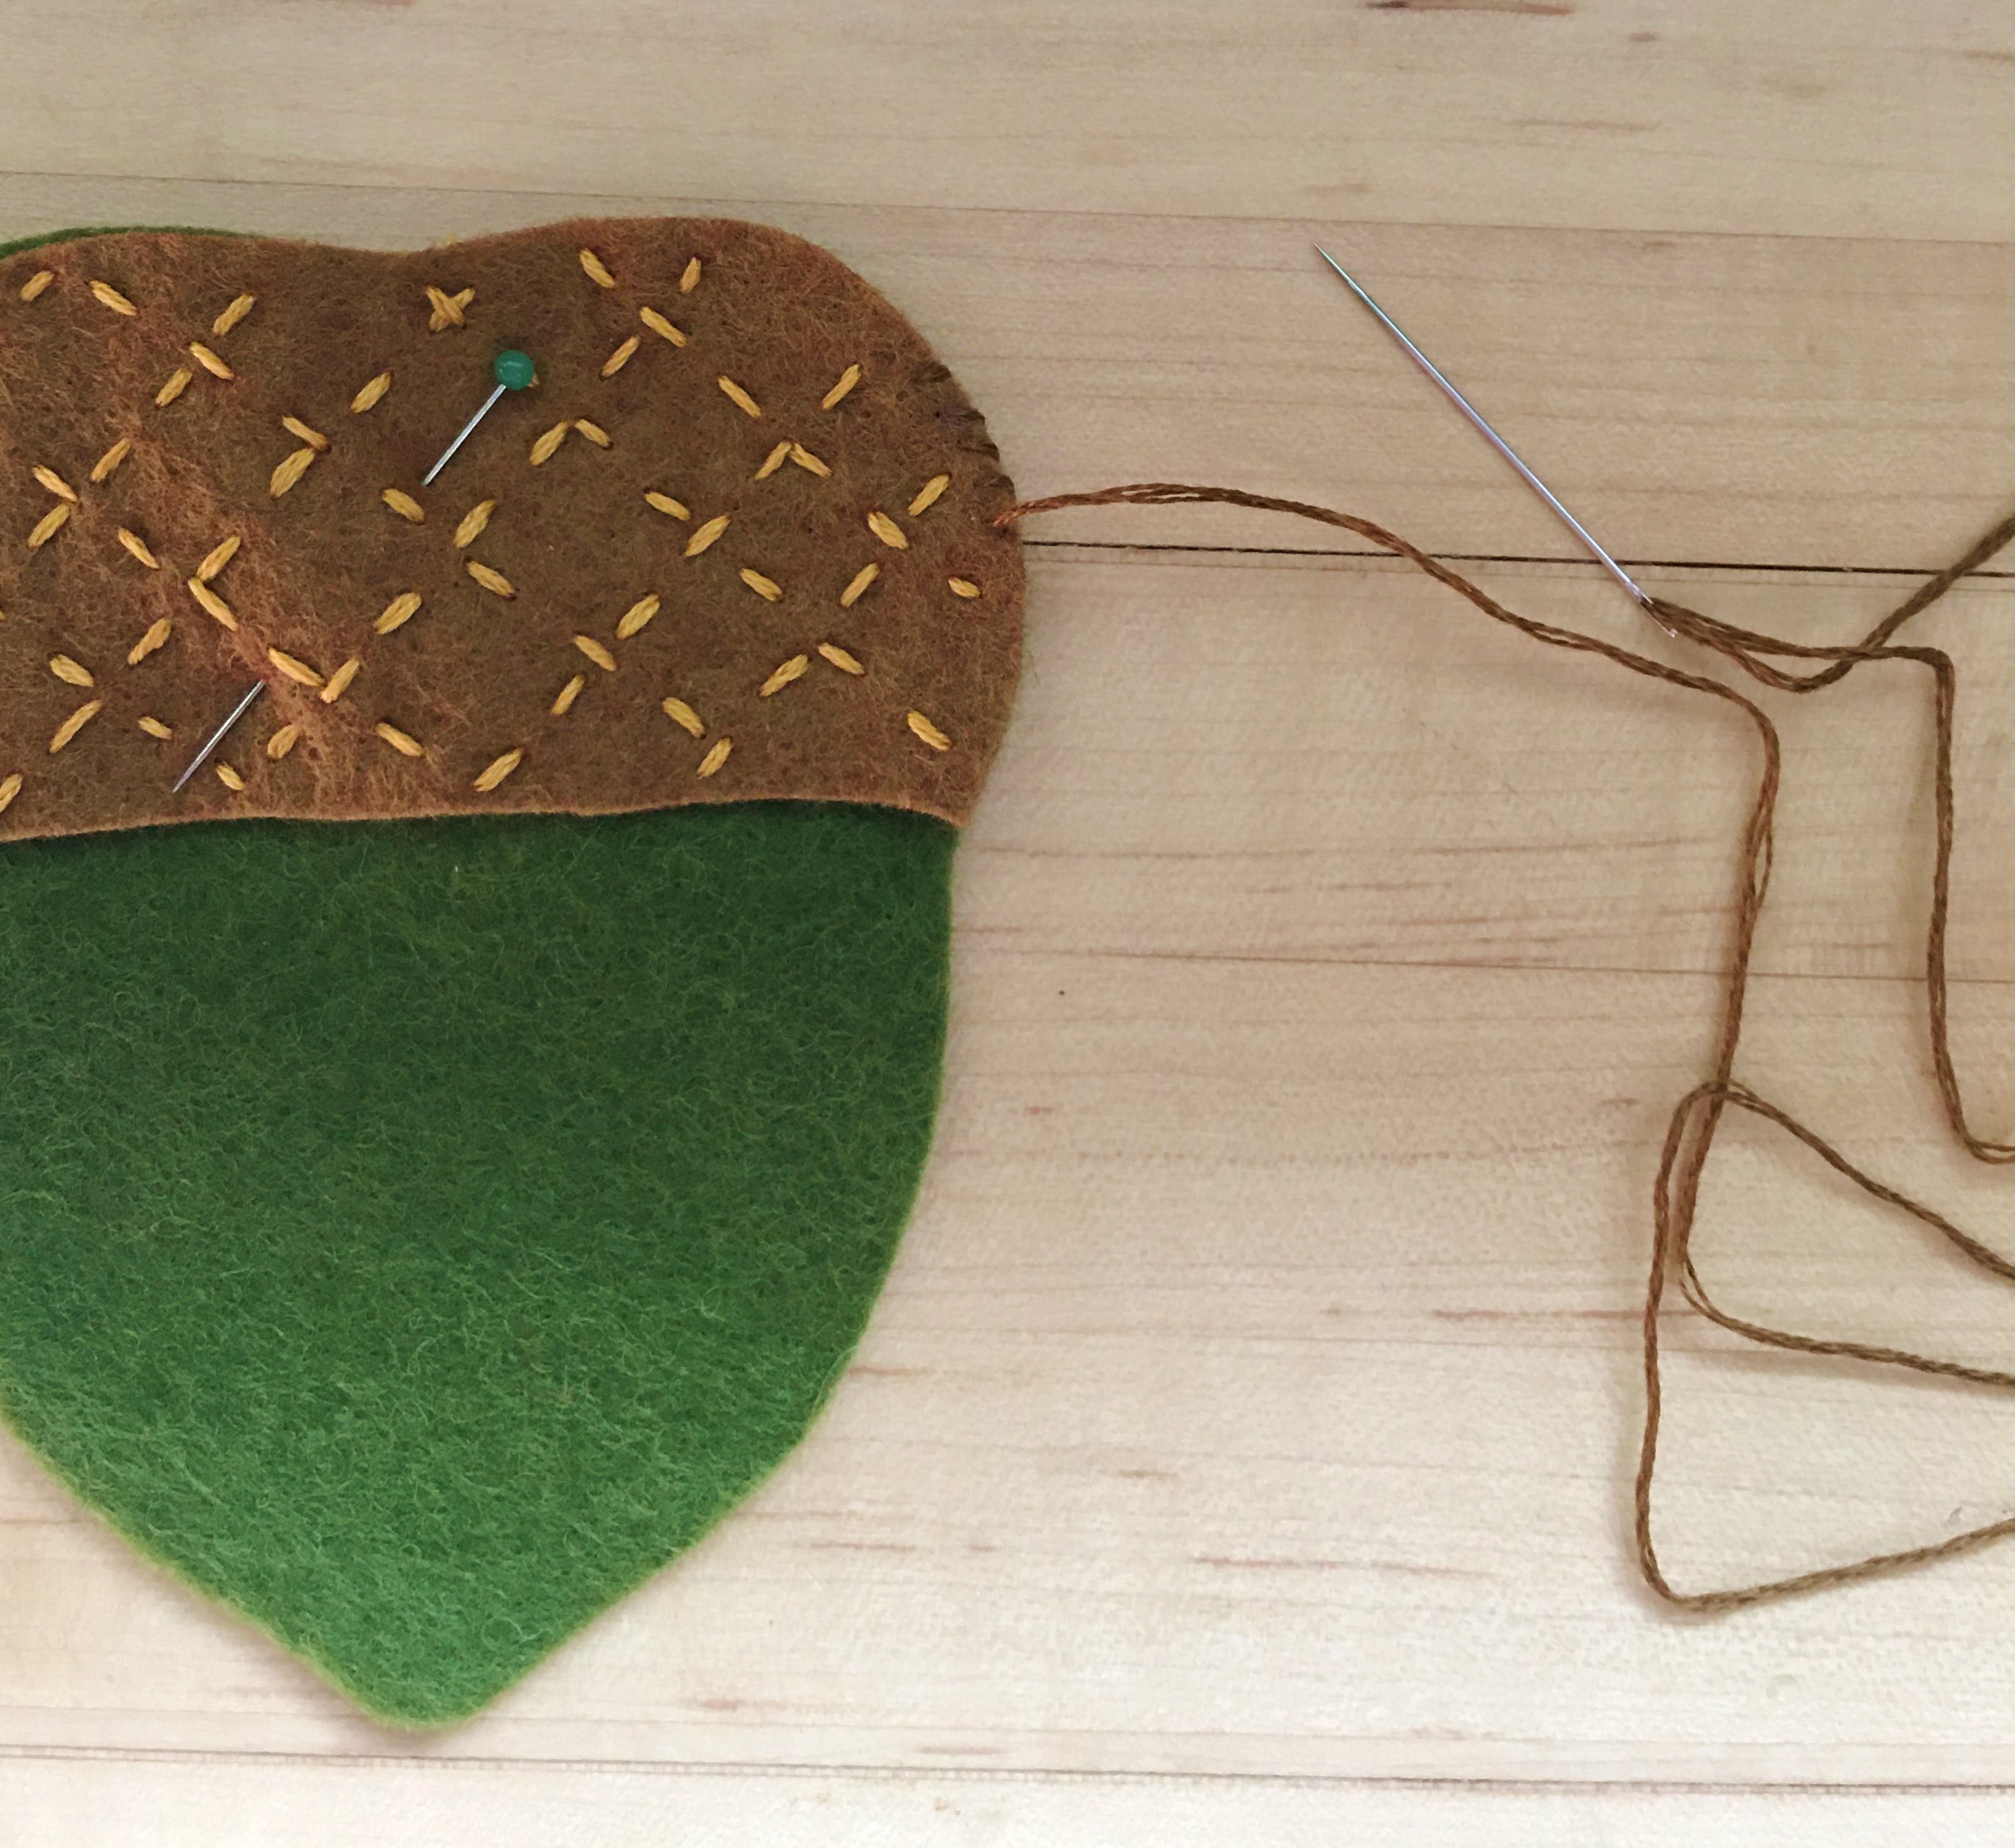
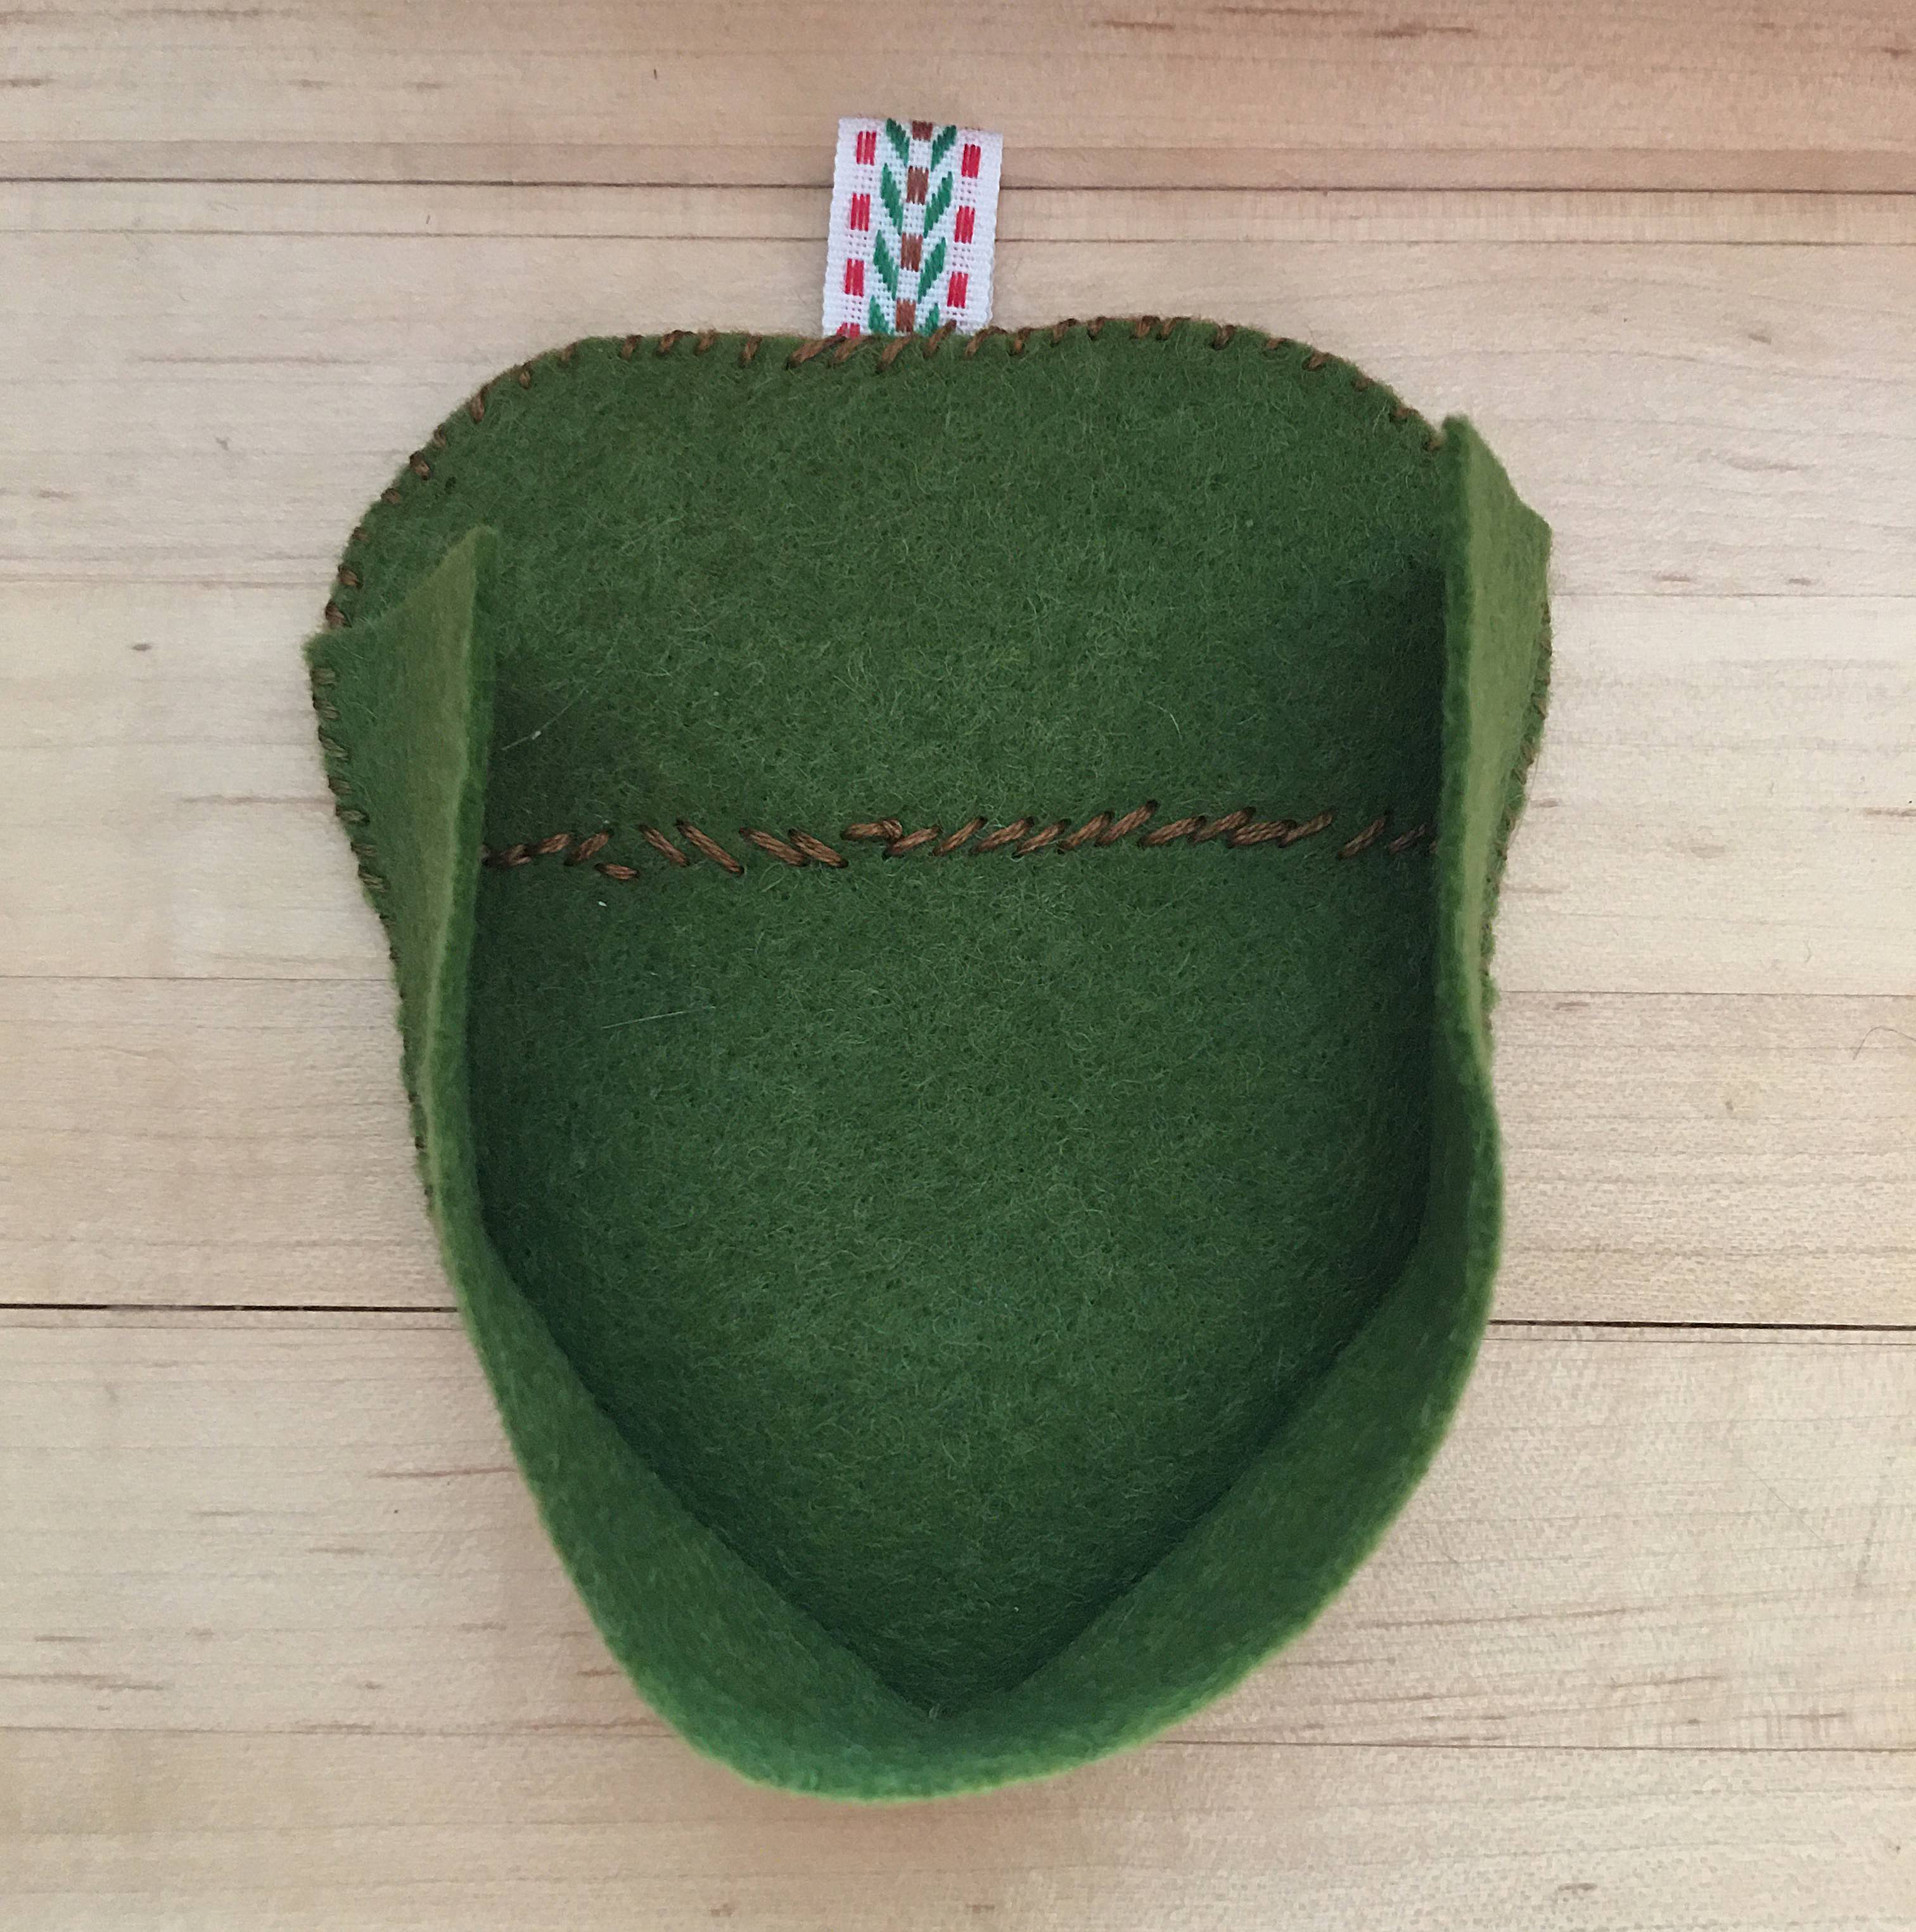
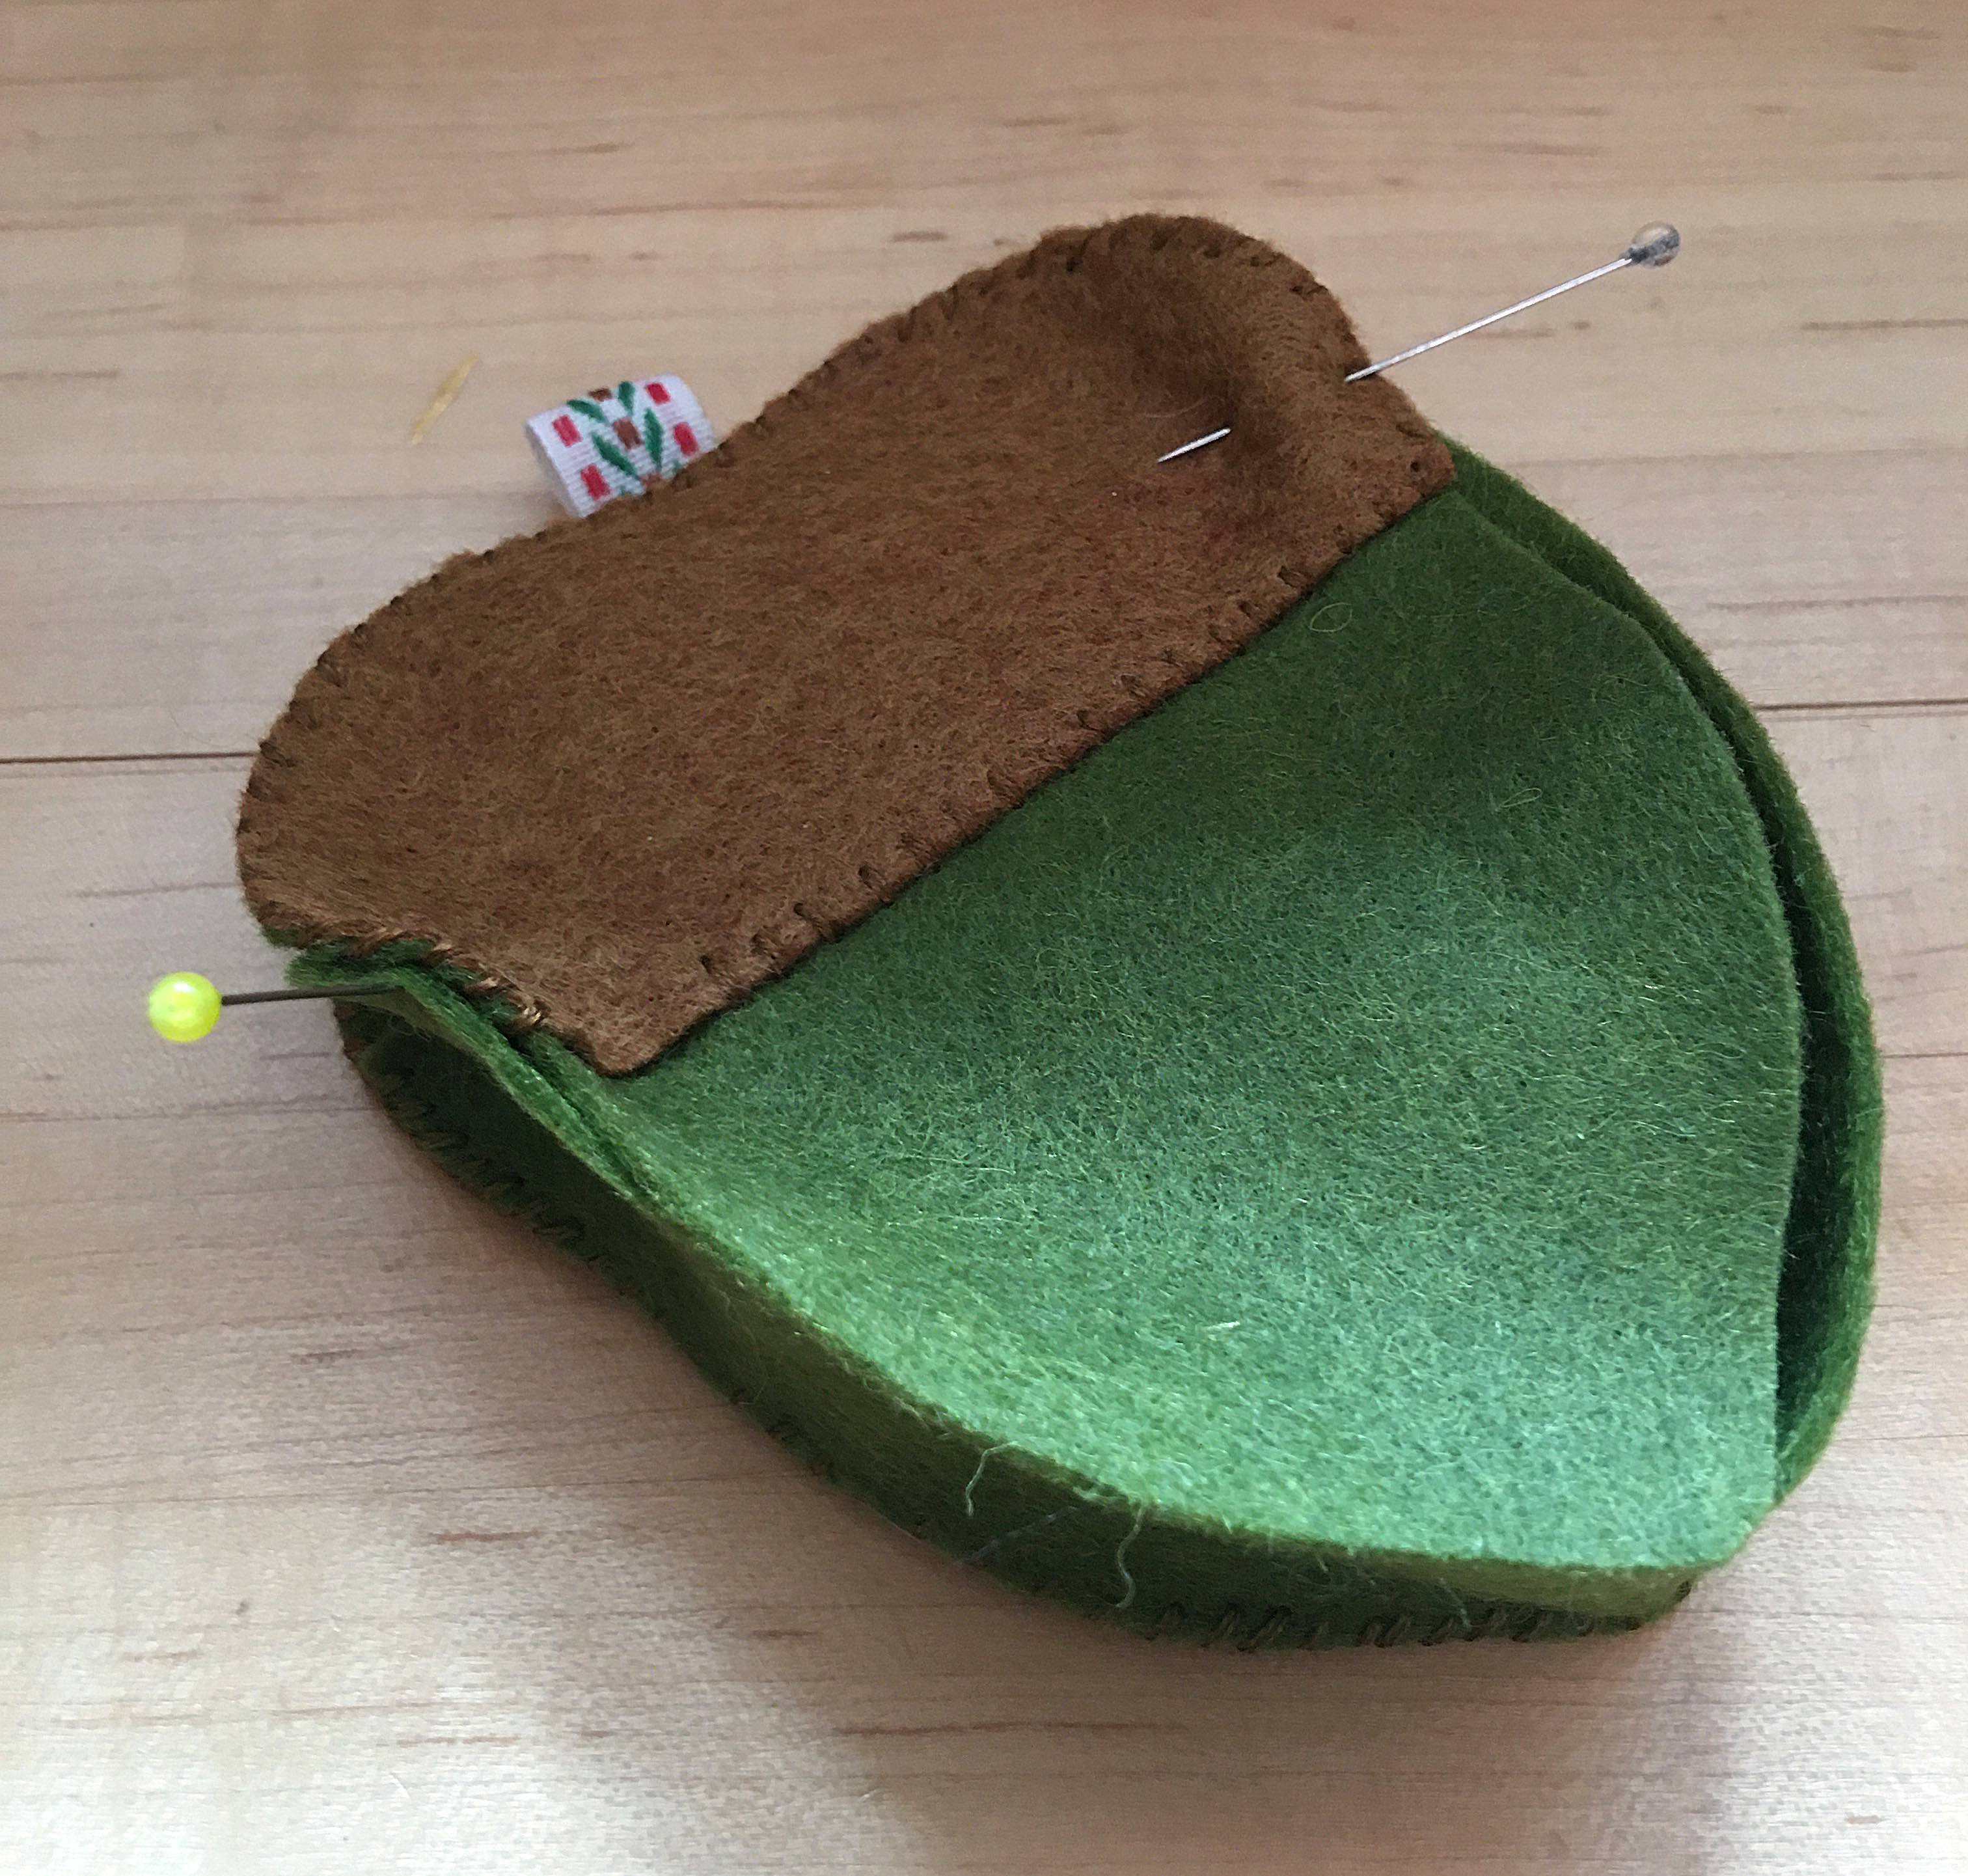
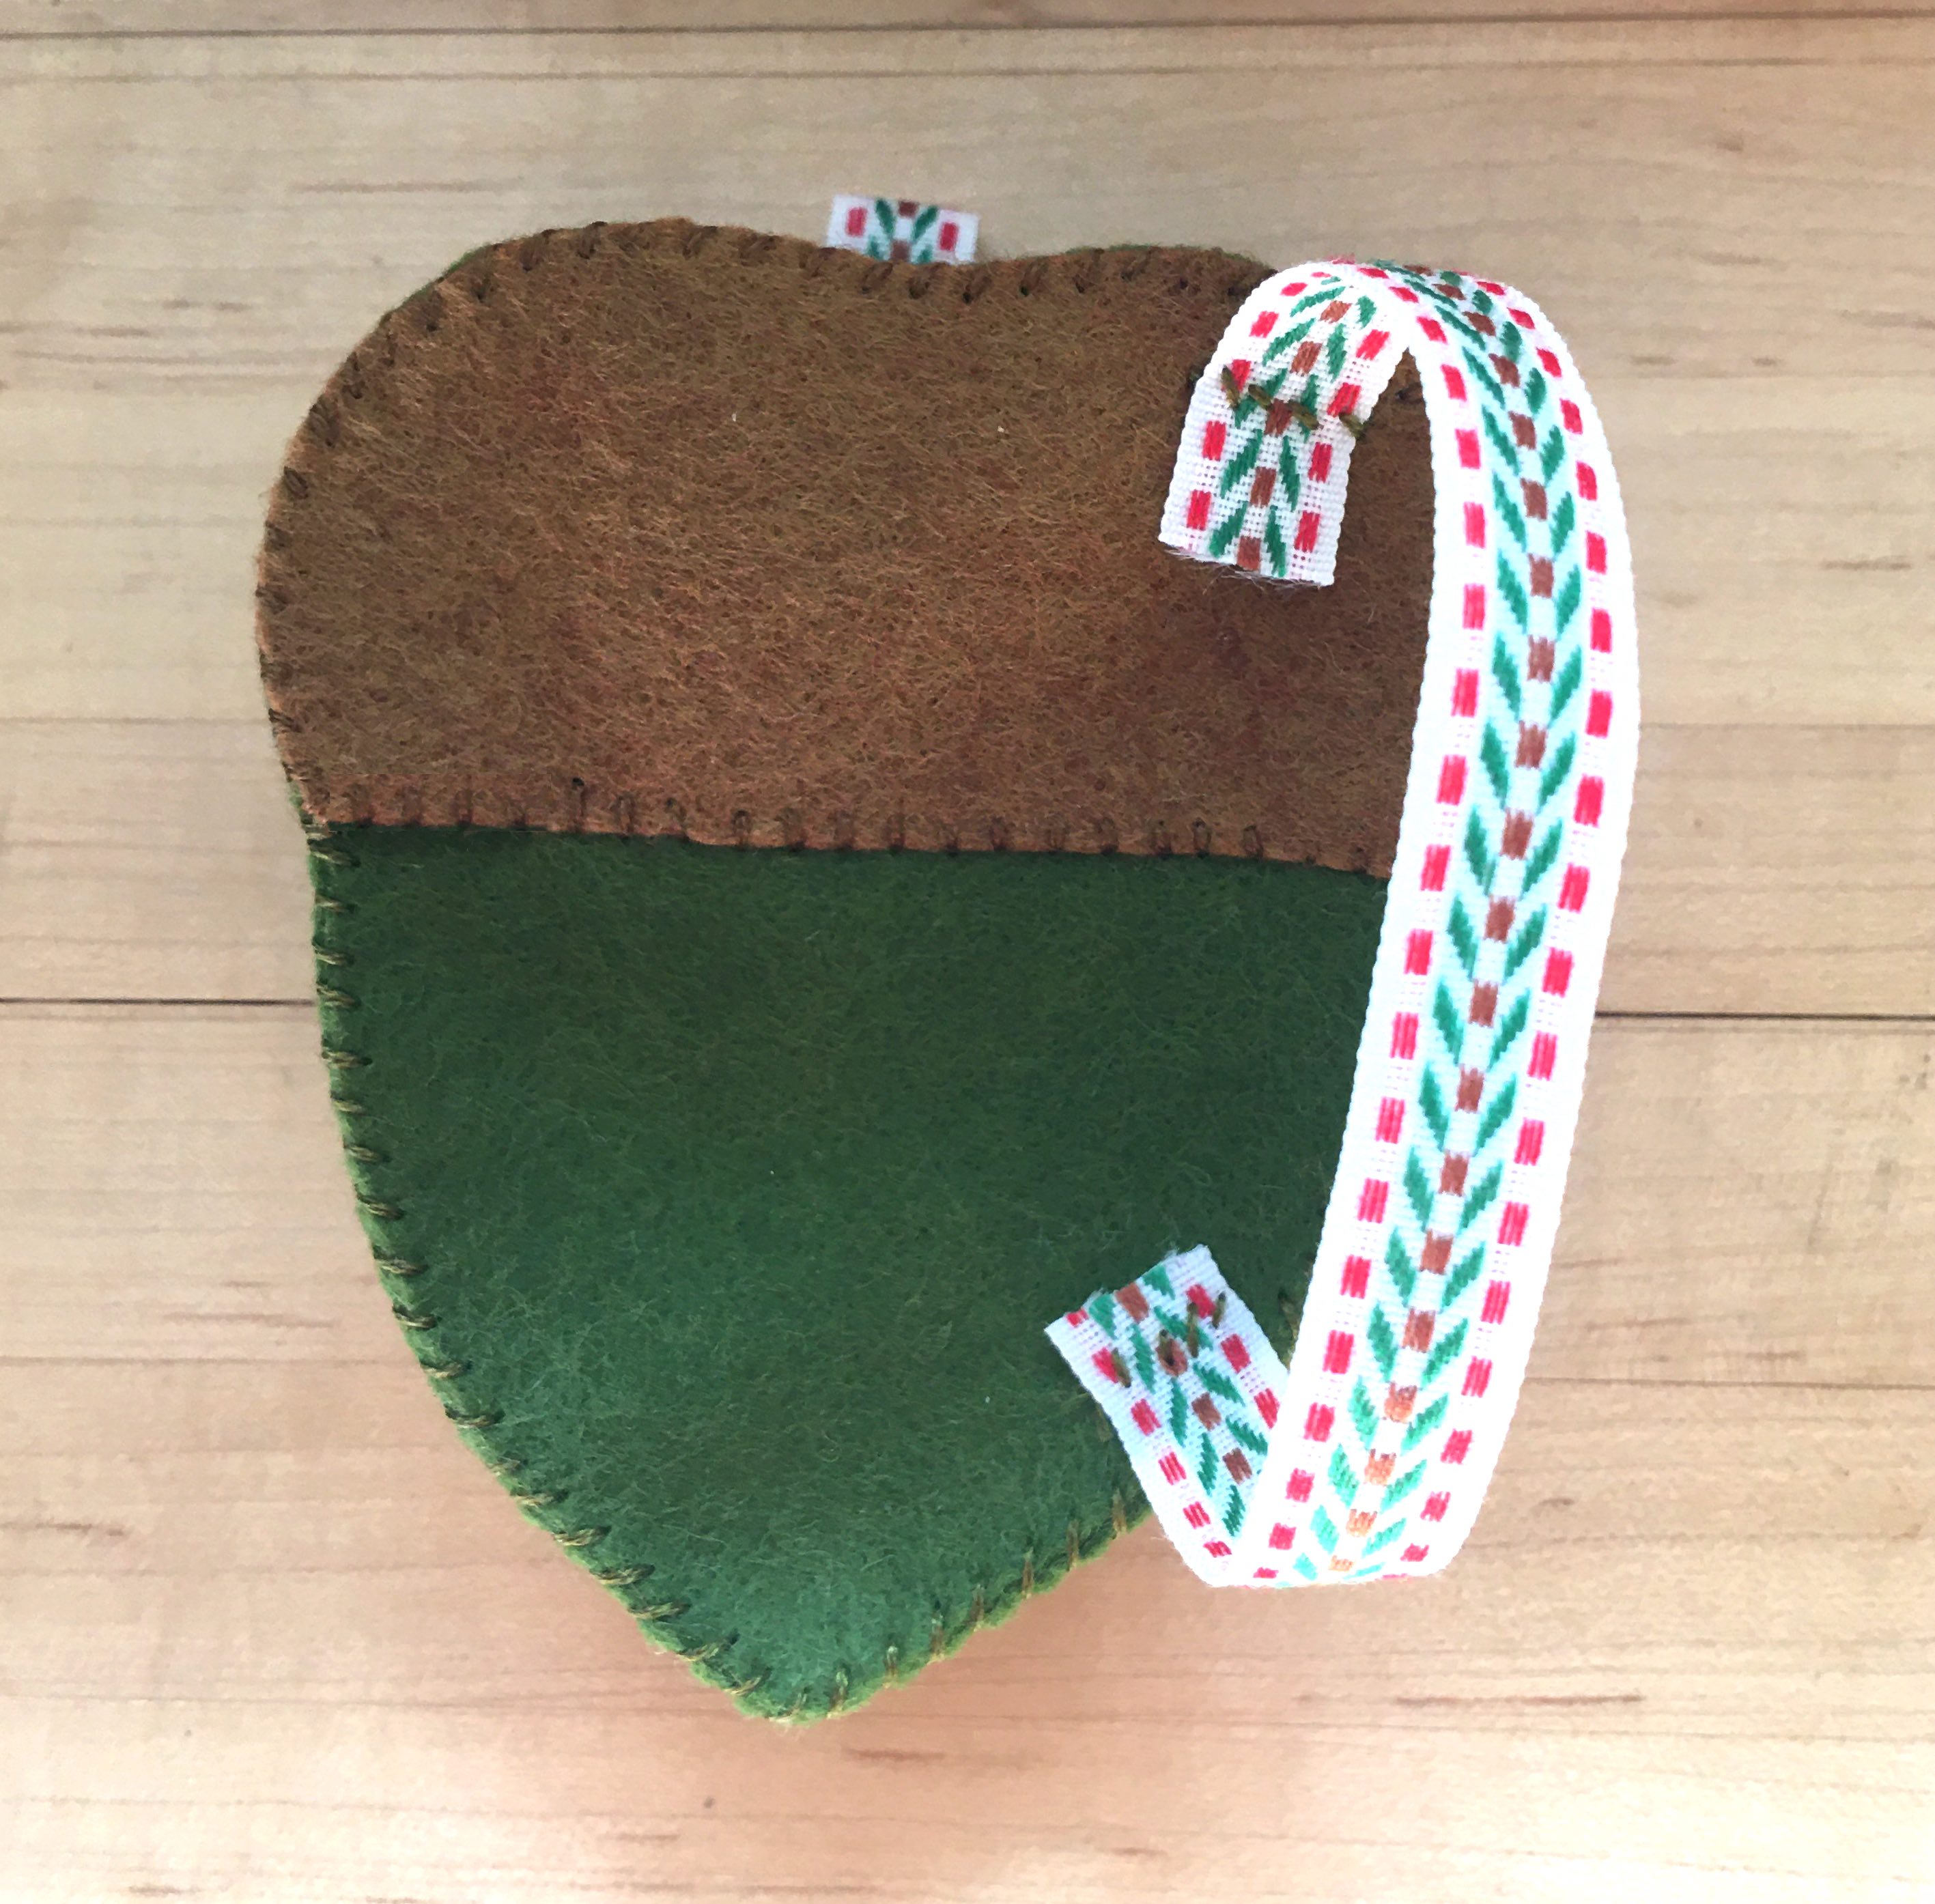
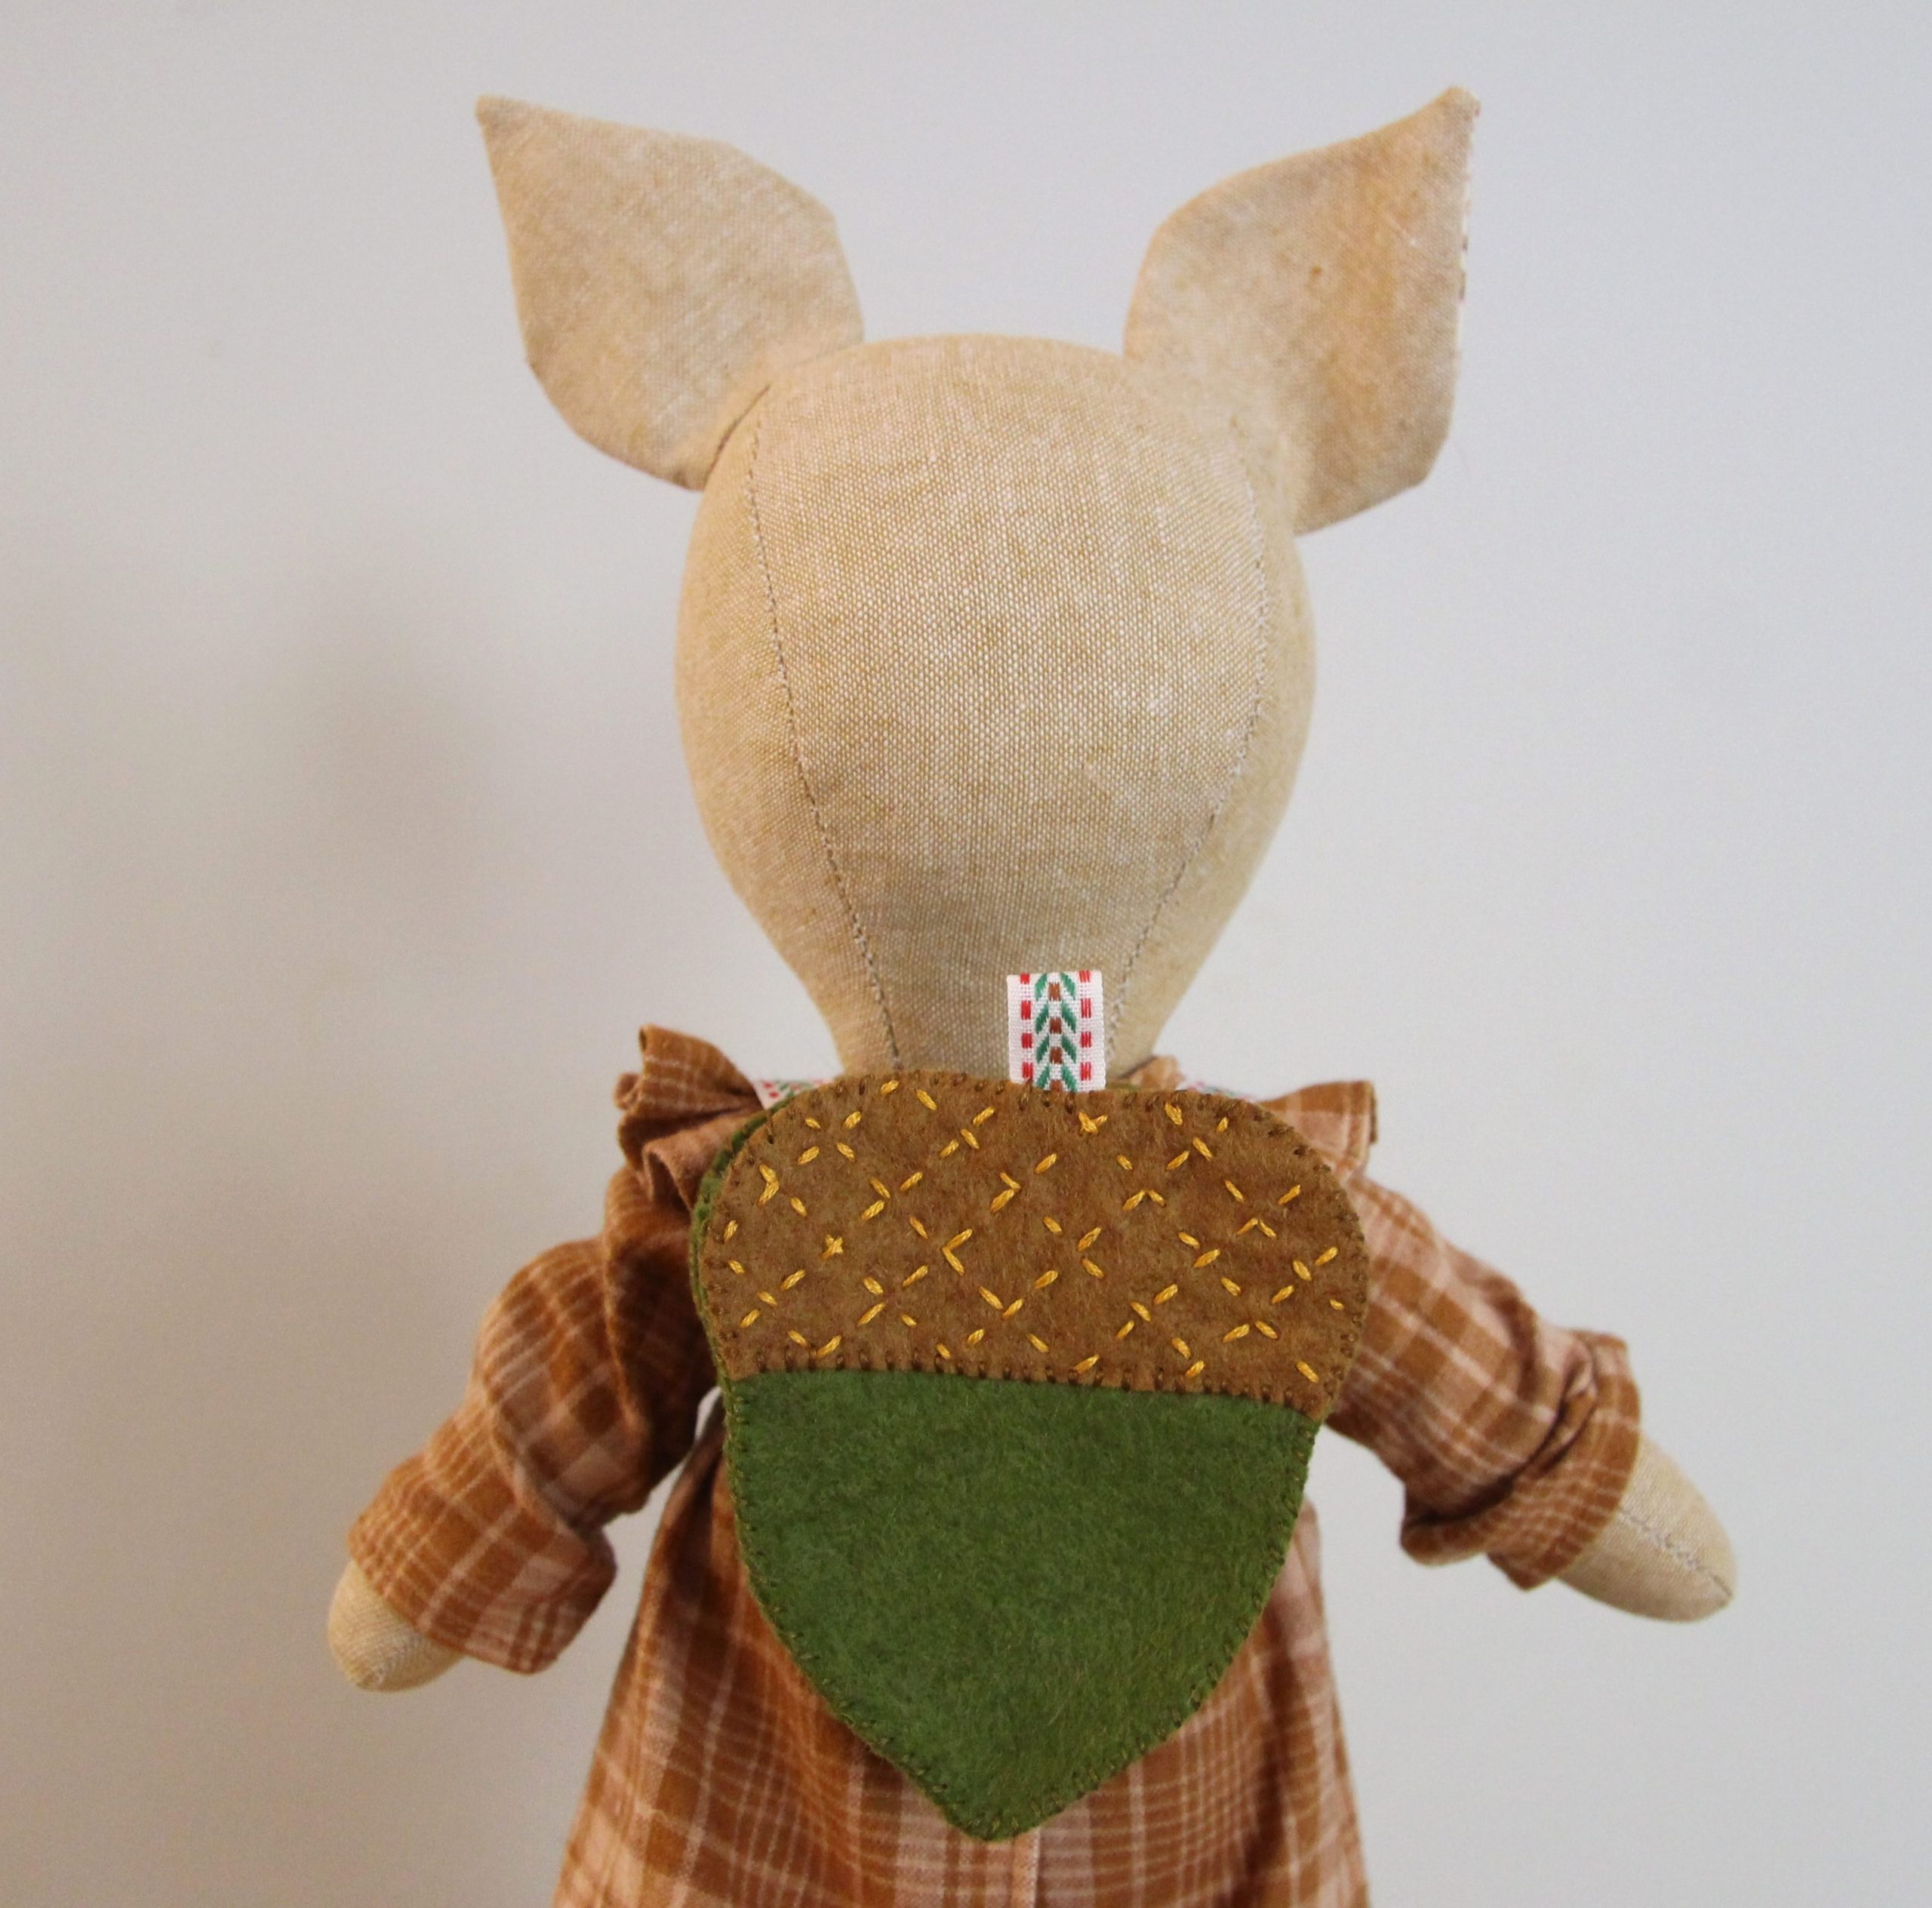
Send your Make-Along doll out on a nature walk with this cute wool felt acorn backpack to store all their treasures. Click here to download PDF of pattern and the directions are below.

MATERIALS NEEDED:
• 8″ x 8″ green wool felt for nut
• 4″ x 4″ brown wool felt for shell
• 14″ of 1/2″ wide ribbon for stem and straps
• embroidery floss in green, brown and gold

TO MAKE: The Acorn Backpack is a handsewing project using wool felt and floss.

1. Using 4 strands of the gold floss and a running stitch, stitch cross-hatch design pattern onto one of the shell pieces. (you can repeat for both sides but since one side is facing the back I left that one plain.)

2. Make the stem by folding the 1 1/2″ piece of ribbon in half and pin to top of nut 1/4″ from the edge. Pin shell to nut piece lining up top edge and using a whipstitch and 3 strands of brown floss sew the shell to the nut. Repeat with back side shell and nut pieces.

3. Pin gusset piece to front piece (lining up half point of gusset with bottom point of nut) and whipstitch together with 3 strands of green floss. To avoid the green floss showing up on the brown shell I brought my needle up between the two layers just catching the green nut below. Sew gusset down one side, across bottom point and back up the other side. Don’t worry if it’s not exactly centered just be sure you pin your back piece on to match.

4. Pin back piece to the gusset in the same way as above and sew together with whipstitch and 3 strands of green floss.

5. For straps, fold under 1/4″ at each edge of 6″ piece of ribbon and sew in place on back.

Posted on Leave a comment

teeny tiny pincushion

I stumbled upon something fun on instagram last week, a tiny pincushion sewing challenge #teenytinypinnieparade, over at tinkerellen. After spending a good hour or so down that rabbit hole of tiny quilted pincushions, leading me to all sorts of wonderful quilting and sewing sites, I ordered some crushed walnut shells from amazon and started plotting. First I tried something a little too ambitious, trying to incorporate this neat trick with a magnetized needleminder button as a tiny teddy bear’s face. After that flop I ended up making this little pumpkin.

They’re doing it again for Christmas and I’m very excited. I’m thinking maybe a little elf, using this freebie bunny pattern as a jumping off point. Or maybe a little gingerbread house like this pattern from my book.

Another great idea I loved were all the cool fussy cut designs for the pincushions. I bet I have something fun in my Christmas fabric I can use. I think I have some of this sweets print left.

Have a look through them all on instagram at the hashtag, #teenytinypinnieparade I bet you get inspired too and want to join in!

Posted on 2 Comments

Make-Along Outfit Variation: Layered Princess

Make-Along Doll princess dressHere’s an outfit for your Make-Along doll that will take her from pajamas to princess in 3 steps.

The first layer works as a nightgown and then becomes the blouse under the pinafore. It has puffed sleeves and elastic at the neck and cuffs. To make the nightgown use the sleeves pattern piece from “First Day of School” blouse. Hem under 1/8″ at the edge and then stretch and sew 1/8″ elastic 1/4″ from edge. For the body of the nightgown modify the Top Front pattern piece from “Sportswear Basics” by adding 1″ more at the center (which because you’re on the fold adds 2″ width to the piece) and add 2″ longer at the hem. Finish the neckline the same as you did for the sleeves. To assemble the nightgown use the same steps as any of the tops in the pattern set – sew body front and back together and the shoulder and then pin the sleeves in place and sew, then sew front and back together under the arms and down the sides. Final step, hem.

Make-Along Doll princess dressNext for a more casual look, before princessing duties need to begin perhaps, just throw a skirt over that nightgown and she’s good to go. Use the “School Days” skirt with elastic waist but skip the pockets.

Make-Along Doll princess dress

Now for the last piece, when it’s time to get fancy, top off with a pinafore layer with bows sewn to the bodice and an open-in-the-front skirt, a Robe à l’Anglaise type of thing that really takes it up a notch. For the pinafore bodice use the “Pajama Party” bodice front and back pattern piece modifying the front piece by cutting the front neckline into a slightly deeper swoop. For the skirt cut 26″x6″ piece of fabric, hem the bottom and side edges and gather the top edge. Assemble as you would the pajama party top but instead of having the skirt edges line up with the bodice stop short about 3/4″ on each side. The instructions for how to line the bodice for “Pajama Party” or “Summer Picnic” dress will work here. Sew snaps closures at front of bodice and decorative bows on the front for that super regal vibe.

Make-Along Doll princess dress

And I think that’s it! You could sew a tulle or lace petticoat to further puff up the ensemble if you’d like. Oh, her lace stockings are cut using the leg pattern piece and her shoes are from “Lotsa Layers”.

Posted on 4 Comments

Regency era doll clothes for my Jane Austen inspired art dolls

Elizabeth Bennet (costume inspiration here)

I love making art dolls based on literary heroines. I’ve made Laura Ingalls Wilder, Jo March, Anne of Green Gables, the three friends – Betsy, Tacy & Tib, and Jane Austen heroines Elizabeth Bennet & Emma. I really enjoy the challenge of capturing not only their look and spirit but also tackling the historical costumes. I think in a parallel universe I am a costume designer. And in that reality I know all the historically accurate details of every era. In this reality, not so much! I’m driven by my love of the pretty dresses I see in movies and my desire to get things right *enough*. Without going down too many rabbit holes I try to get the dress silhouette and the fabric as close as I can using  costuming sites,  movies or whatever books I can find in my public library for reference.

I was so pleased with this dress fabric/spencer color combination but still want to tackle this sleeve

For my Jane Austen dolls I was pretty much channeling my love of the 1995 Pride and Prejudice and trying to recreate those costumes as closely as I could. This is when I discovered this super fun site, Frock Flicks and their post on P&P. I realized none of the choices at the fabric store were going to work for the muslin dresses I was trying to reproduce. Quilting cottons are too stiff and reproduction fabrics, which at first seem like a perfect solution and may work for actual people costumes, are not doll sized scale. Then I read that Dinah Collins had her fabrics custom stamped (see video link below) and I tried briefly to carve some stamps and try my hand at printing my own. But I was quickly derailed by how small the stamps would have to be and the loose weave of the light weight fabrics I was using. So I hit the thrift stores and that’s where I had the most luck.

dress fabric from L to R: thrited blouse, 80s vintage calico, scarf, skirt, scarf

I needed very thin, gauzy cottons so I looked through blouses and skirts and found some great prints that could read as 19th century sprigged muslin dresses. Thrifted blouses and skirts are also great for laces, cottons, and pieces with nice inserts and details that make a small doll skirt look deceivingly intricate. It can also be easier to find soft, lightweight, tightly woven cottons in garments at a thrift store than at a chain fabric store.

thrifted blouses

It’s always exciting to follow a lark and end up obsessing over the details of a new creative endeavor. I always start on a whim and then I come up with a game plan for them after. I was making an Elizabeth just for me and my craft room shelves and then decided to sell a limited series in my shop because I wanted to make more than one dress.

As far as tiny details in doll clothes go, I’m a moderate. These art dolls have slimmer arms and smaller bodies than the dolls I sell patterns for so the sewing is definitely more fussy and more small scale, but it’s still nowhere near as tiny as clothes made for dollhouse or Blythe dolls, of which I’m in complete awe. I don’t really have a customer base that would support super elaborate, very expensive dolls so I always hit a sort of invisible line of how much time can I spend on something before I get back to reality and that keeps the costumes I make within a certain level of ambition. Regency style works within these limits because it is relatively simple design and materials. I figured out a basic dress design, the jacket (spencer), boots because Elizabeth is always romping outside and the bonnet.

Elizabeth’s boots & bonnet

I would love to tackle something like Edwardian or civil war era gowns but that would mean sewing with fabrics like silk and getting really into tiny frills and way more complicated dress construction, fascinating but slightly terrifying trying to imagine how to get that all right. Am I talking myself into it or out of it?  And how to find the right fabrics for that! Daunting considering the month I spent scouring thrift stores looking for the perfect persimmon-colored floral print to make my favorite Elizabeth Bennet dress.

Jennifer Ehle in my favorite P&P dress

I am getting close with this dress below. It’s a reproduction print quilting cotton so it’s stiffer than I’d like. (Oh! and I went through a whole thing experimenting with ways to sort of break down and soften up quilting cottons… borax, tennis balls in the dryer. That never really panned out.) So I’m still on the hunt for the perfect mini print on sheer fabric in that just right, pink color. That’s why I picked up that red blouse in my latest thrift haul in that picture above. Closer, but still not quite it.

Here are some fun trips down the rabbithole:

Dinah Collins discussing costuming for 1995 Pride and Prejudice. (begins at 3:38)

Half Dress, Full Dress, Undress, what?? 

Interview with cast & costume Designer Rosalind Ebbutt of the 2009 version of Emma. I loved the costumes in this movie but was confused by why they were so colorful compared to other regency era period pics. They get into it. Also I stan Rosalind Ebbutt bc she did one of my all time favorites, The Buccaneers!

“Undressing your heroine”, so interesting! I’m actually on the right track with my Emma doll. I wanted to make something that was stand-alone cute so made this petticoat/chemise hybrid but it actually sort of looks like the petticoat on this site so, yay!

Emma’s petticoat
Posted on Leave a comment

Pom Pom Sweater for the Make-Along Doll

The new knitting pattern for the Make-Along Pom Pom Sweater is up in the shop now. Phew, that was hard! Huge thanks to my pattern testers Carrie and Yvonne. Yvonne is an excellent tech editor and really helped me with all the details.

This sweater is worth the effort of making all those little bobbles. There is something seriously huggable about a soft cloth doll in a nubby sweater. I’ve made two so far but really want one for all my dolls so it’s going on the list for holiday knitting.

All the details are on the pattern page. The yarn I used was Madelinetosh Euro Sock Yarn that I bought in a bundle of mini skeins. They were the perfect amount for doll sweaters.